BigQuery Connector
The BigQuery Connector allows you to load data from your existing BigQuery into Tinybird. You can load full tables or load the result of a SQL query.
The BigQuery Connector is fully managed and requires no additional tooling. You can define a sync schedule inside Tinybird and execution is taken care of for you.
It isn't currently possible to query BigQuery external tables (like connected Google Sheets). If this is a requirement for you, share your use case with us on support@tinybird.co.
Load a BigQuery table
Load a BigQuery table in the UI
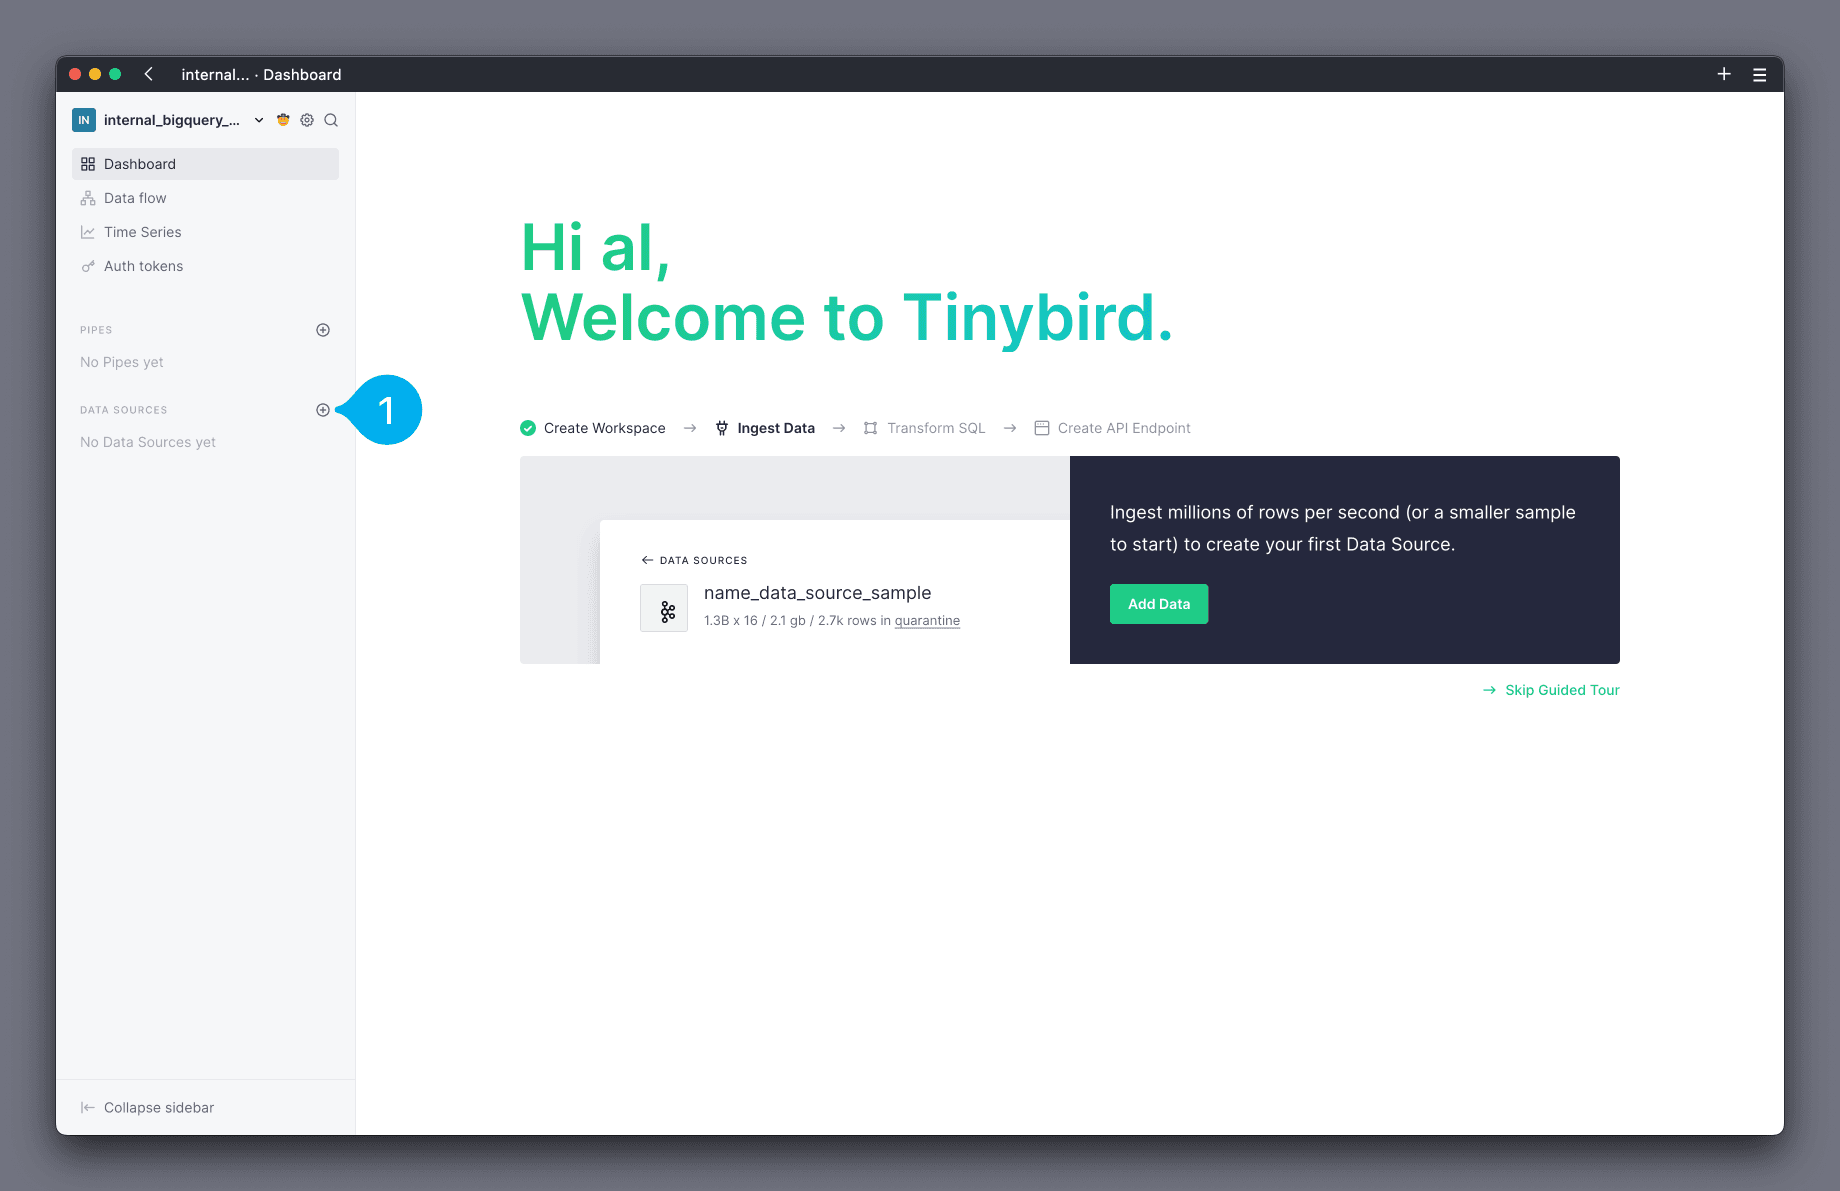
Open the Tinybird UI and add a new Data Source by clicking the + icon next to the Data Sources section on the left hand side navigation bar (see Mark 1 below).
In the modal, select the BigQuery option from the list of Data Sources.
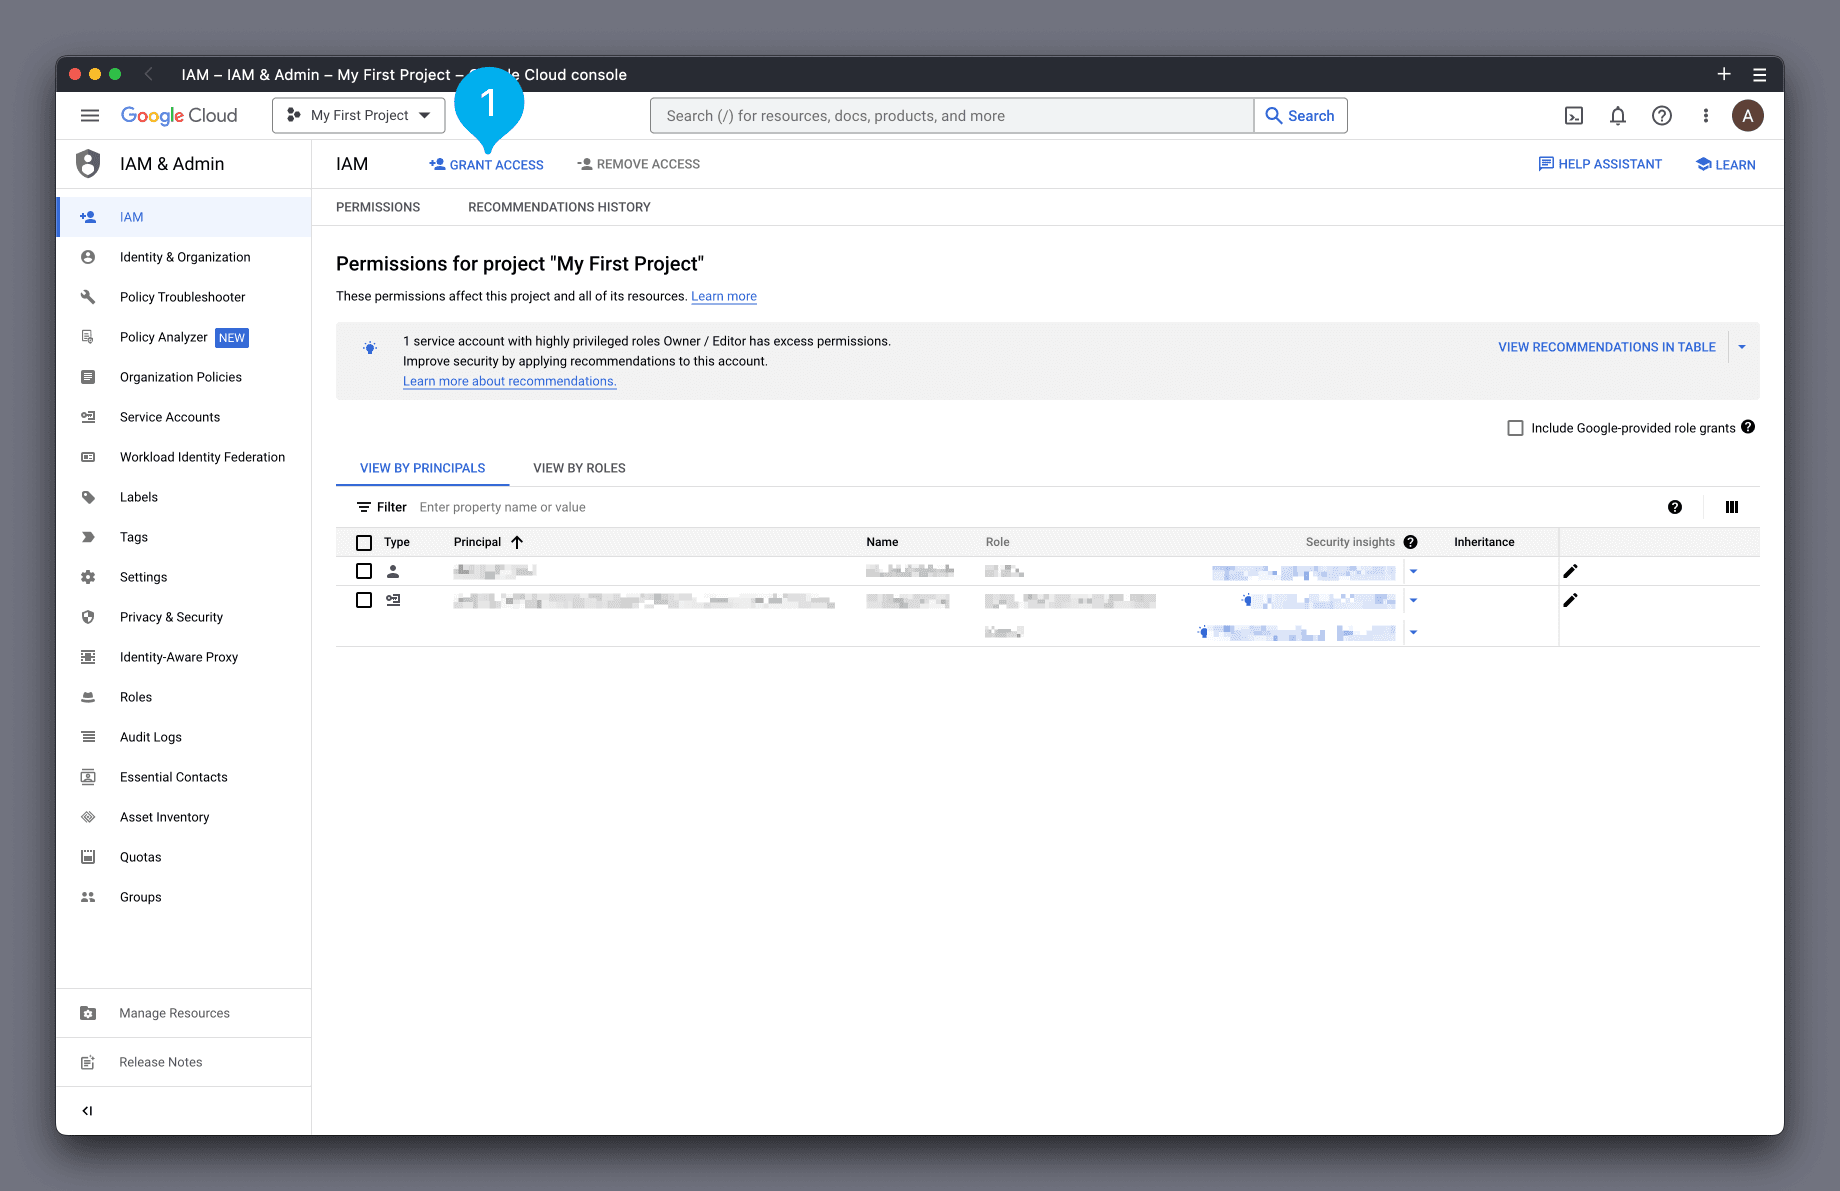
The next modal screen shows the Connection details. Follow the instructions and configure access to your BigQuery. Access the GCP IAM Dashboard by selecting the IAM & Admin link, and use the provided principal name from this modal.
In the GCP IAM Dashboard, click the Grant Access button (see Mark 1 below).
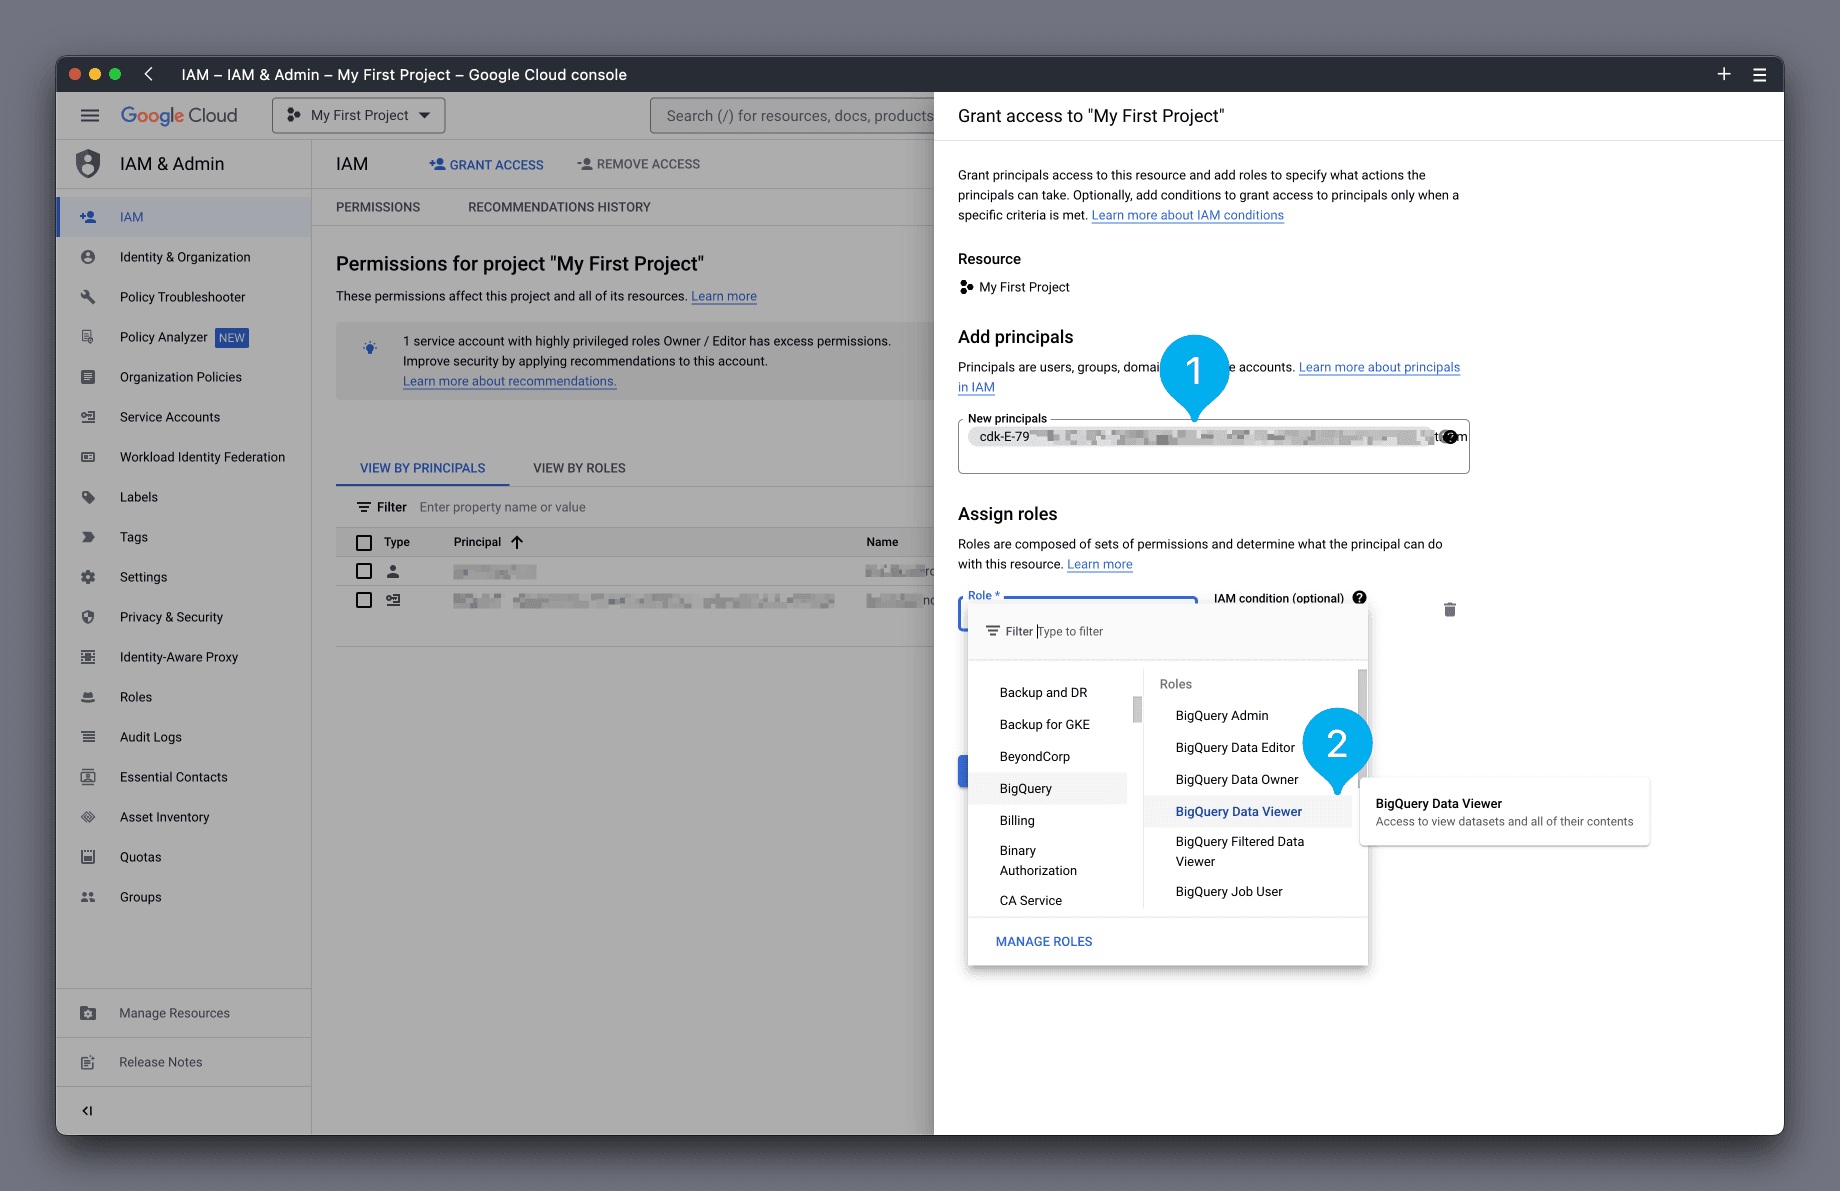
In the box that appears on the right-hand side, paste the principal name you just copied into the New principals box (see Mark 1 below). Next, in the Role box, find and select the role BigQuery Data Viewer (see Mark 2 below).
Click Save to complete.
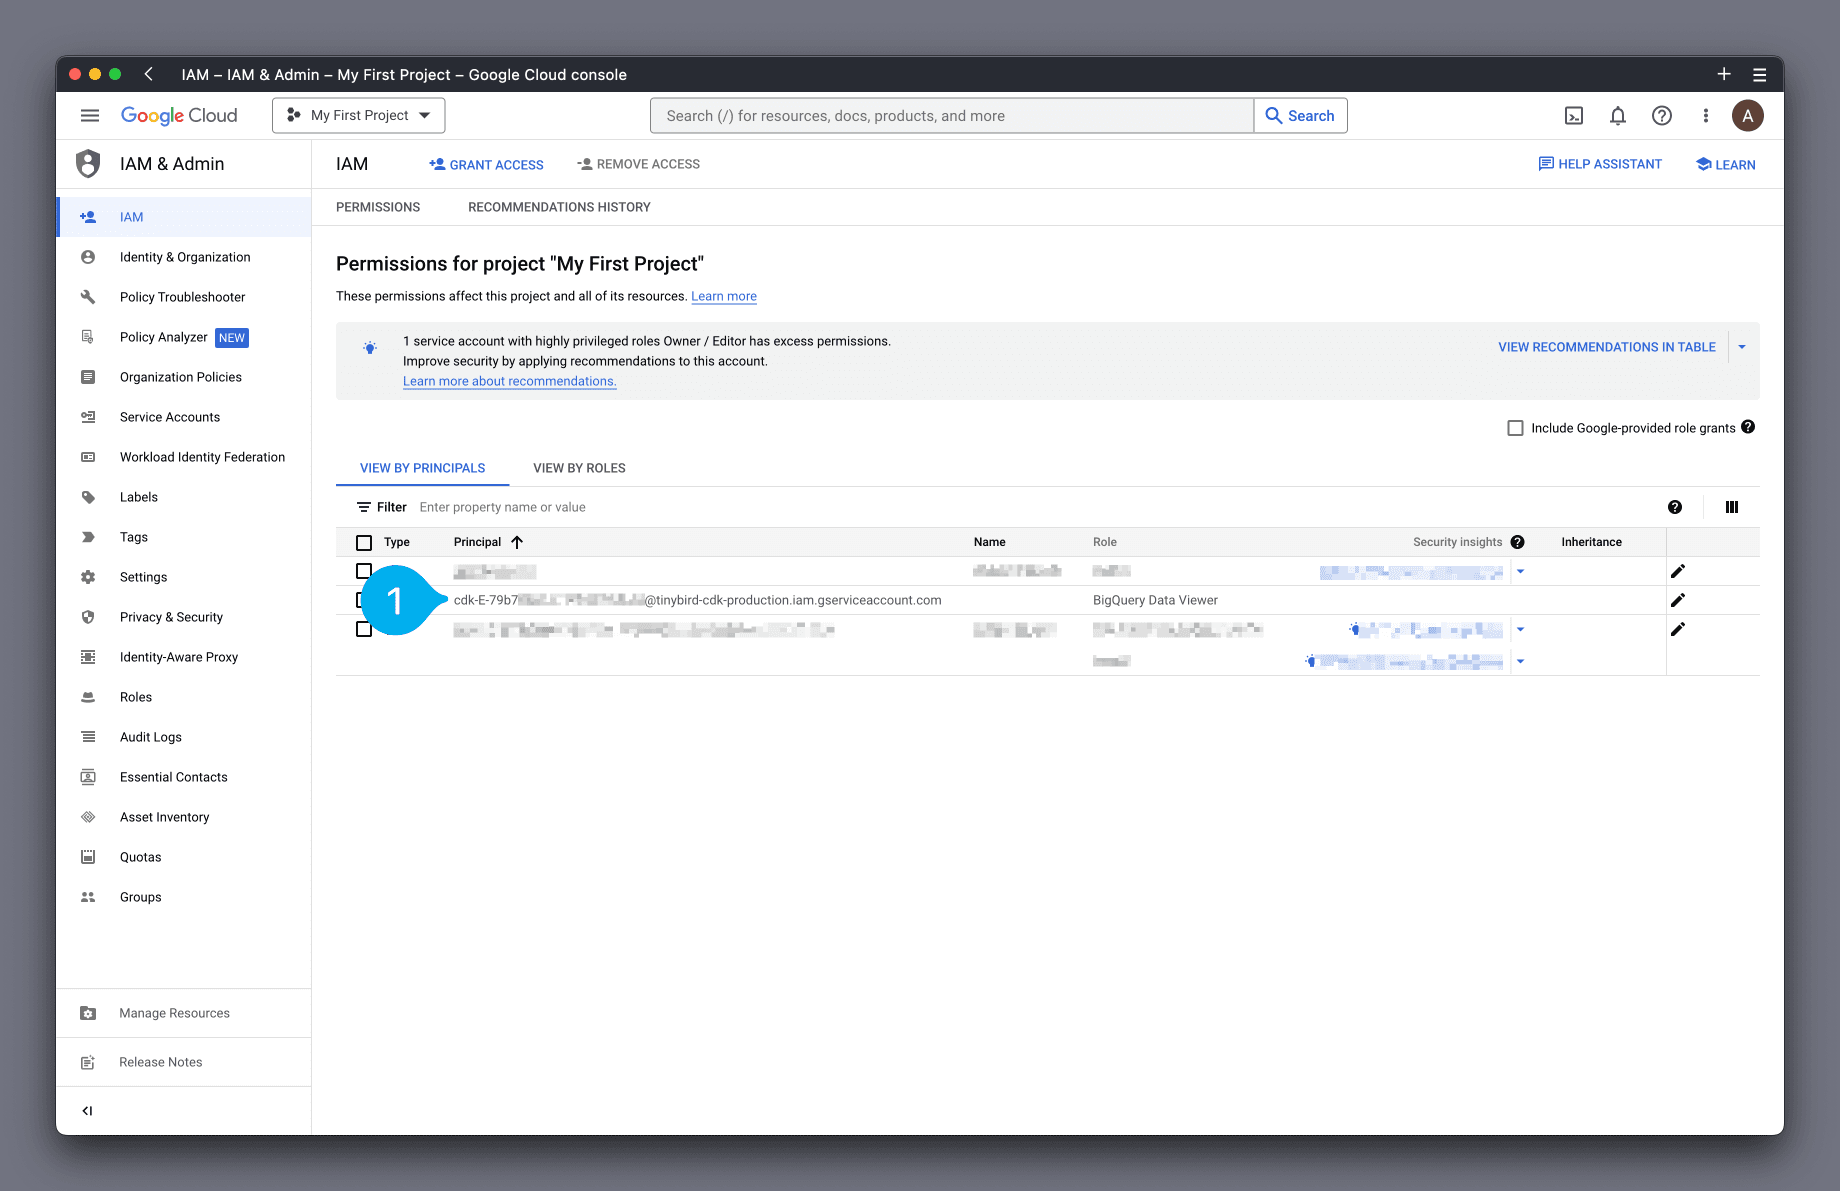
The principal should now be listed in the View By Principals list (see Mark 1 below).
OK! Now return to the Tinybird UI. In the modal, click Next (see Mark 1 below).
Note: It can take a few seconds for the GCP permissions to apply.
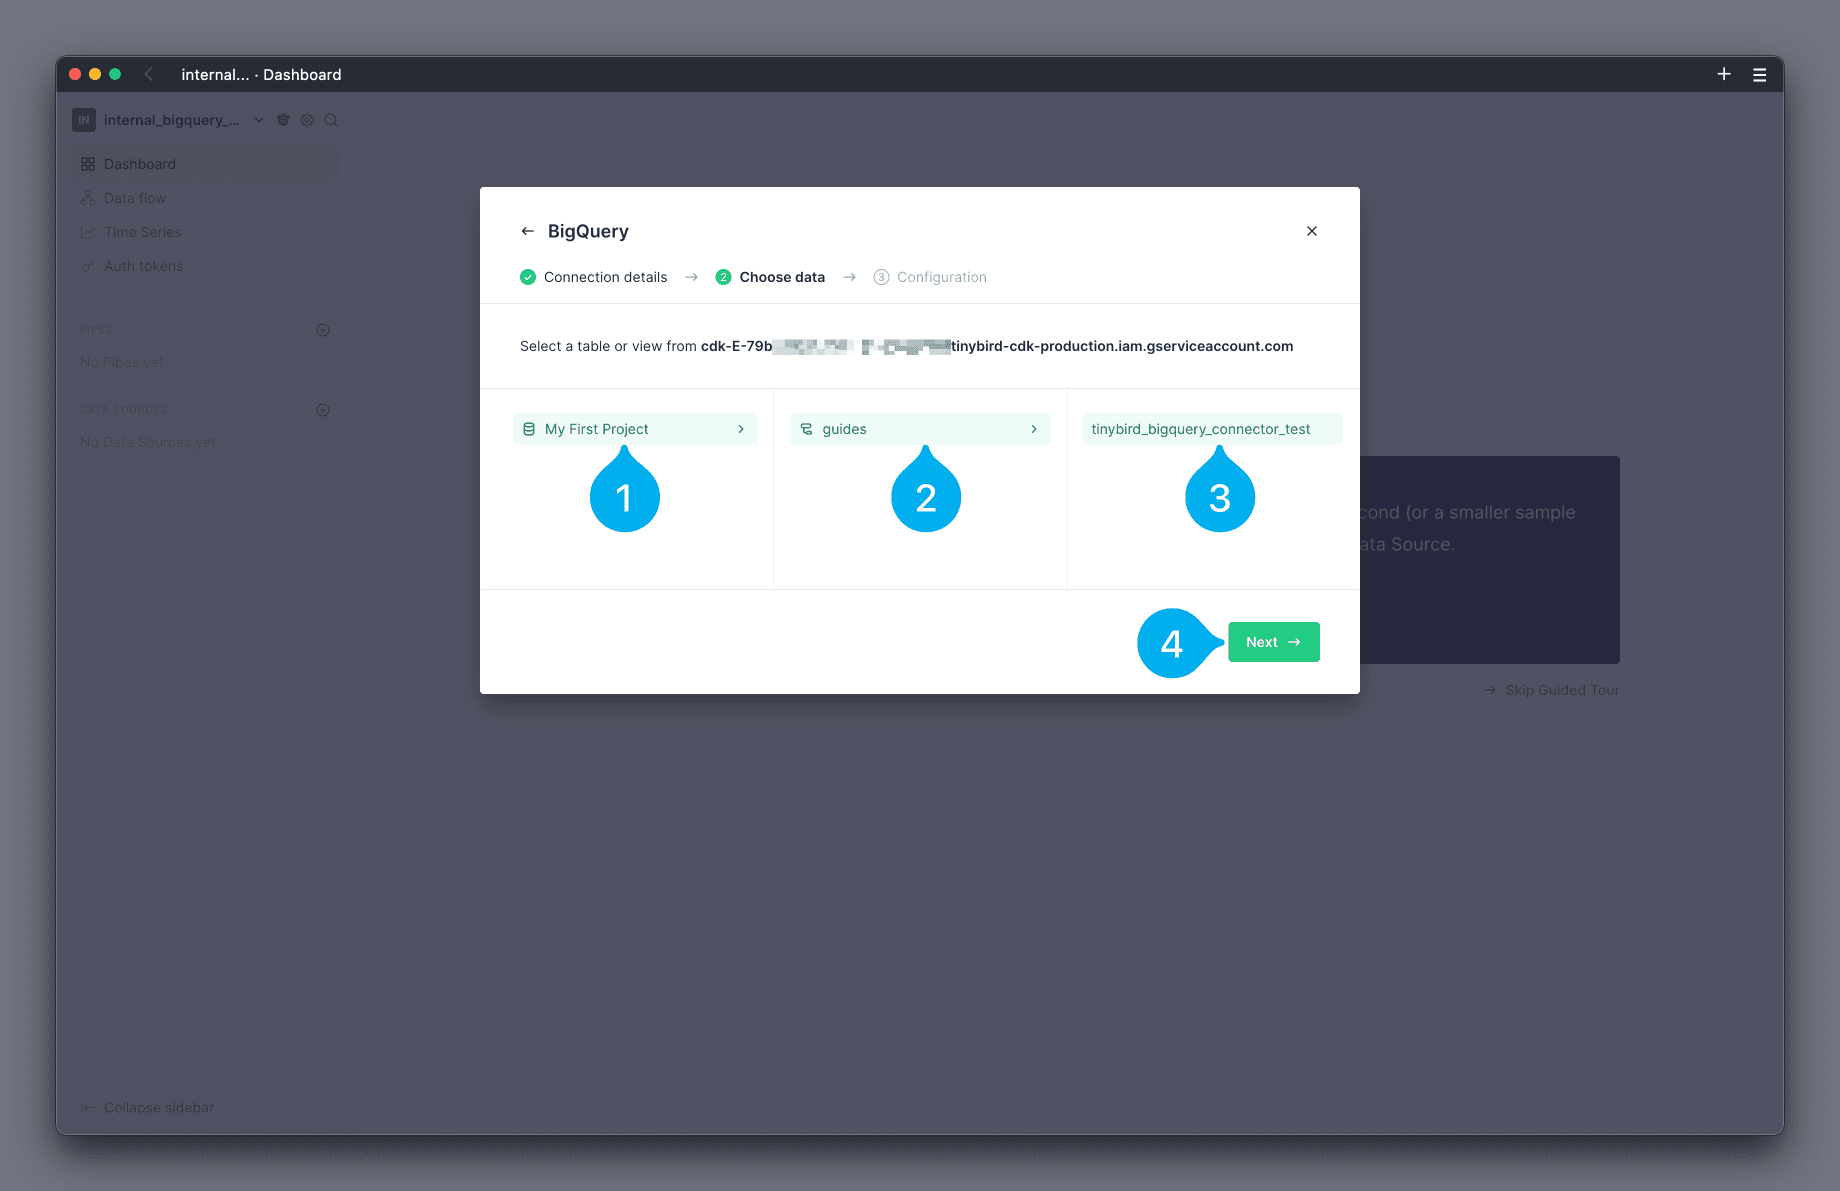
The next screen allows you to browse the tables available in BigQuery, and select the table you wish to load. Start by selecting the project that the table belongs to (see Mark 1 below), then the dataset (see Mark 2 below) and finally the table (see Mark 3 below). Finish by clicking Next (see Mark 4 below).
Note: the maximum allowed table size is 50 million rows, the result will be truncated if it exceeds that limit.
You can now configure the schedule on which you wish to load data. You can configure a schedule in minutes, hours, or days by using the drop down selector, and set the value for the schedule in the text field (see Mark 1 below). The screenshot below shows a schedule of 10 minutes. Next, you can configure the Import Strategy. The strategy Replace data is selected by default (see Mark 2 below). Finish by clicking Next (see Mark 3 below).

Note: the maximum allowed frequency is 5 minutes.
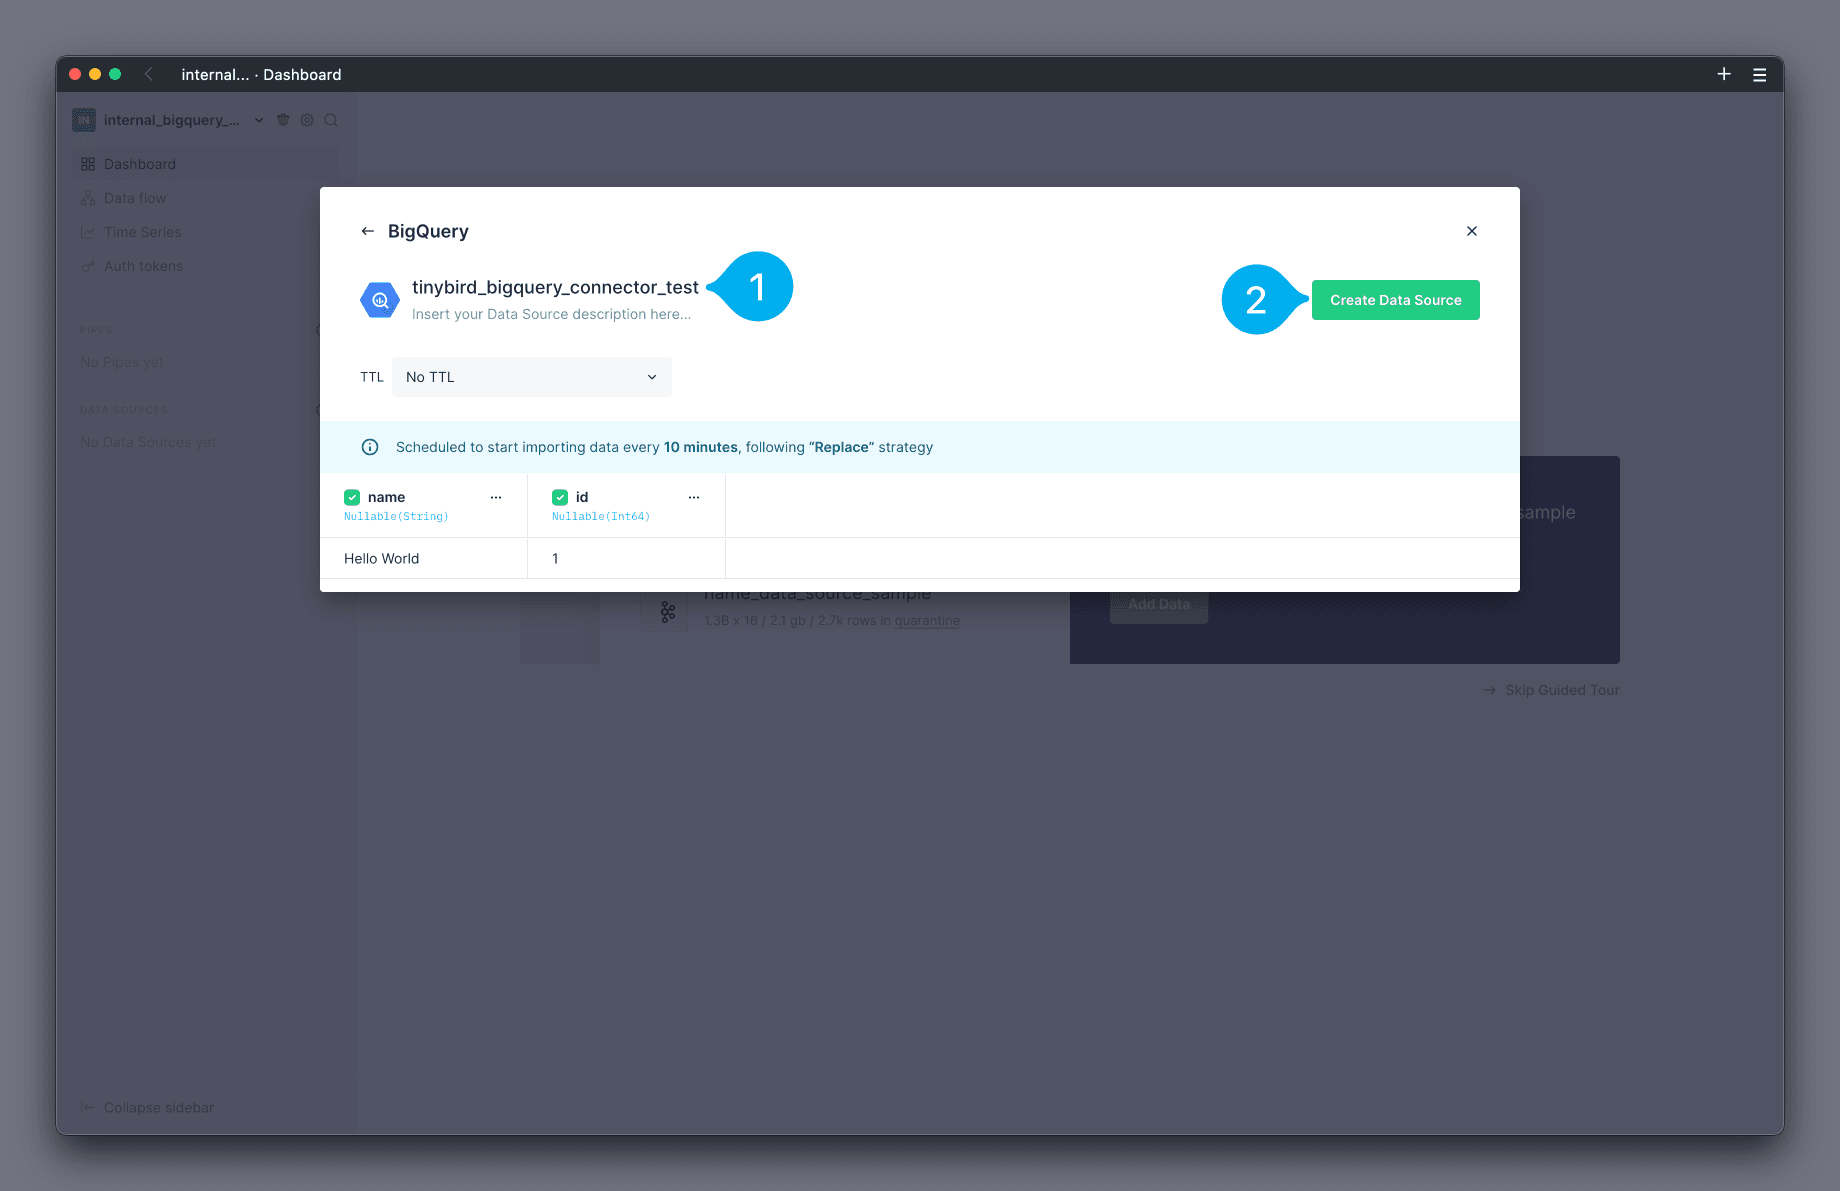
The final screen of the modal shows you the interpreted schema of the table, which you can edit as needed. You can also modify what the Data Source in Tinybird will be called by changing the name at the top (see Mark 1 below). To finish, click Create Data Source (see Mark 2 below).
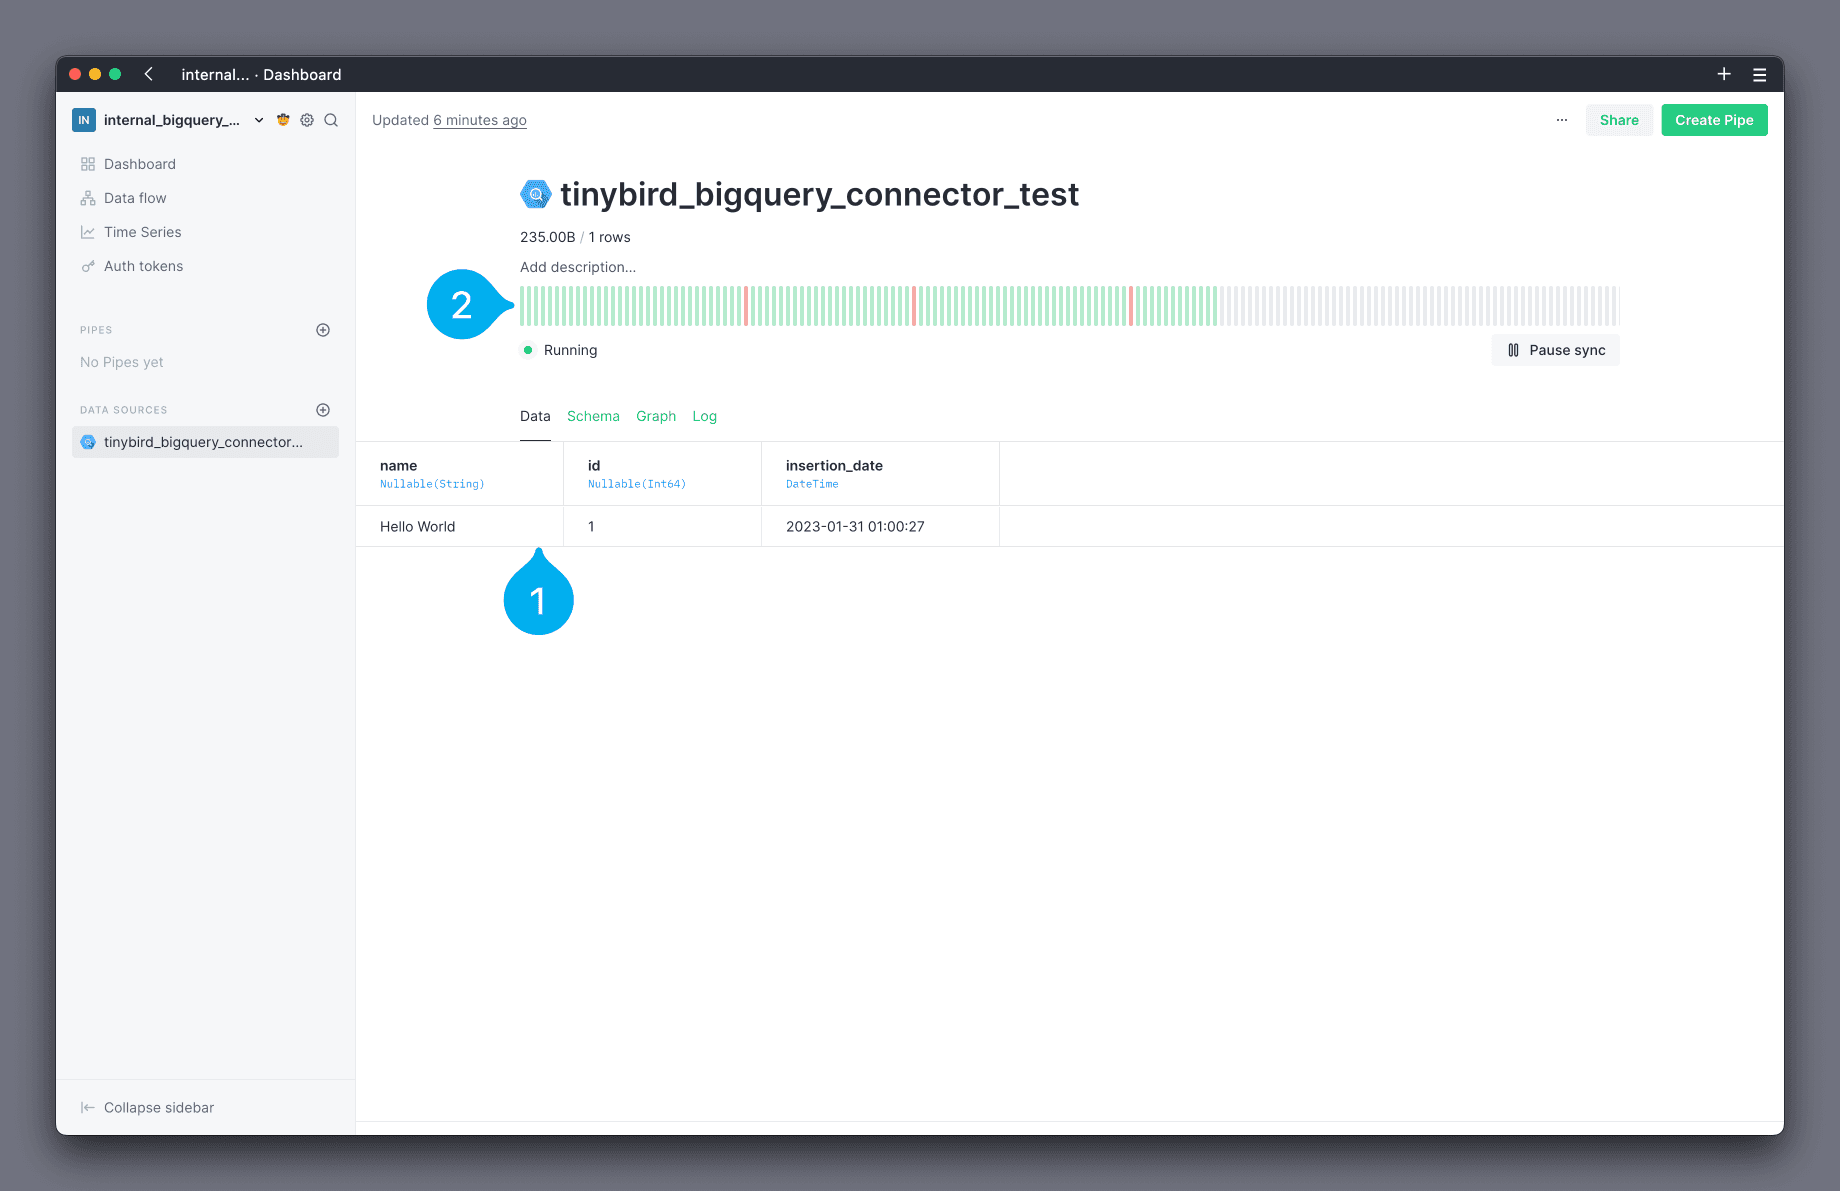
🎉 Your Data Source has been created! 🎉 You are now on the Data Source data page, where you can view the data that has been loaded (see Mark 1 below) and a status chart showing executions of the loading schedule (see Mark 2 below).
Load a BigQuery table in the CLI
You need to create a connection before you can load a BigQuery table into Tinybird using the CLI. Creating a connection grants your Tinybird Workspace the appropriate permissions to view data from BigQuery.
Authenticate your CLI and switch to the desired Workspace. Then run:
tb connection create bigquery
The output of this command includes instructions to configure a GCP principal with read only access to your data in BigQuery.
The instructions include the URL to access the appropriate page in GCP's IAM Dashboard.
Copy the principal name shown in the output.
In the GCP IAM Dashboard, select the Grant Access button (see Mark 1 below).
In the box that appears on the right-hand side, paste the principal name you just copied into the New principals box (see Mark 1 below). Next, in the Role box, find and select the role BigQuery Data Viewer (see Mark 2 below).
Click Save to complete.
The principal should now be listed in the View By Principals list (see Mark 1 below).
Note: It can take a few seconds for the GCP permissions to apply.
Once done, select yes (y) to create the connection. A new bigquery.connection file is created in your project files.
Note: At the moment, the .connection file is not used and cannot be pushed to Tinybird. It is safe to delete this file. A future release will allow you to push this file to Tinybird to automate creation of connections, similar to Kafka connection.
Now that your connection is created, you can create a Data Source and configure the schedule to import data from BigQuery.
The BigQuery import is configured using the following options, which can be added at the end of your .datasource file:
IMPORT_SERVICE: name of the import service to use, in this case,bigqueryIMPORT_SCHEDULE: a cron expression (UTC) with the frequency to run imports, must be higher than 5 minutes, e.g.*/5 * * * *IMPORT_STRATEGY: the strategy to use when inserting data, eitherREPLACEorAPPENDIMPORT_EXTERNAL_DATASOURCE: (optional) the fully qualified name of the source table in BigQuery e.g.project.dataset.tableIMPORT_QUERY: (optional) the SELECT query to extract your data from BigQuery when you don't need all the columns or want to make a transformation before ingestion. The FROM must reference a table using the full scope:project.dataset.table
Both IMPORT_EXTERNAL_DATASOURCE and IMPORT_QUERY are optional, but you must provide one of them for the connector to work.
Note: For IMPORT_STRATEGY only REPLACE is supported today. The APPEND strategy will be enabled in a future release.
For example:
bigquery.datasource file
DESCRIPTION >
    bigquery demo data source

SCHEMA >
    `timestamp` DateTime `json:$.timestamp`,
    `id` Integer `json:$.id`,
    `orderid` LowCardinality(String) `json:$.orderid`,
    `status` LowCardinality(String) `json:$.status`,
    `amount` Integer `json:$.amount`

ENGINE "MergeTree"
ENGINE_PARTITION_KEY "toYYYYMM(timestamp)"
ENGINE_SORTING_KEY "timestamp"
ENGINE_TTL "timestamp + toIntervalDay(60)"

IMPORT_SERVICE bigquery
IMPORT_SCHEDULE */5 * * * *
IMPORT_EXTERNAL_DATASOURCE mydb.raw.events
IMPORT_STRATEGY REPLACE
IMPORT_QUERY >
    select
    timestamp,
    id,
    orderid,
    status,
    amount
        from
        mydb.raw.events
The columns you select in the IMPORT_QUERY must match the columns defined in the Data Source schema. For example, if your Data Source has the columns ColumnA, ColumnB then your IMPORT_QUERY must contain SELECT ColumnA, ColumnB FROM .... A mismatch of columns causes data to arrive in the quarantine Data Source.
With your connection created and Data Source defined, you can now push your project to Tinybird using:
tb push
The first run of the import will begin on the next lapse of the CRON expression.
Configure granular permissions
If you need to configure more granular permissions for BigQuery, you can always grant access at dataset or individual object level.
The first step is creating a new role in your IAM & Admin Console in GCP, and assigning the resourcemanager.projects.get permission.
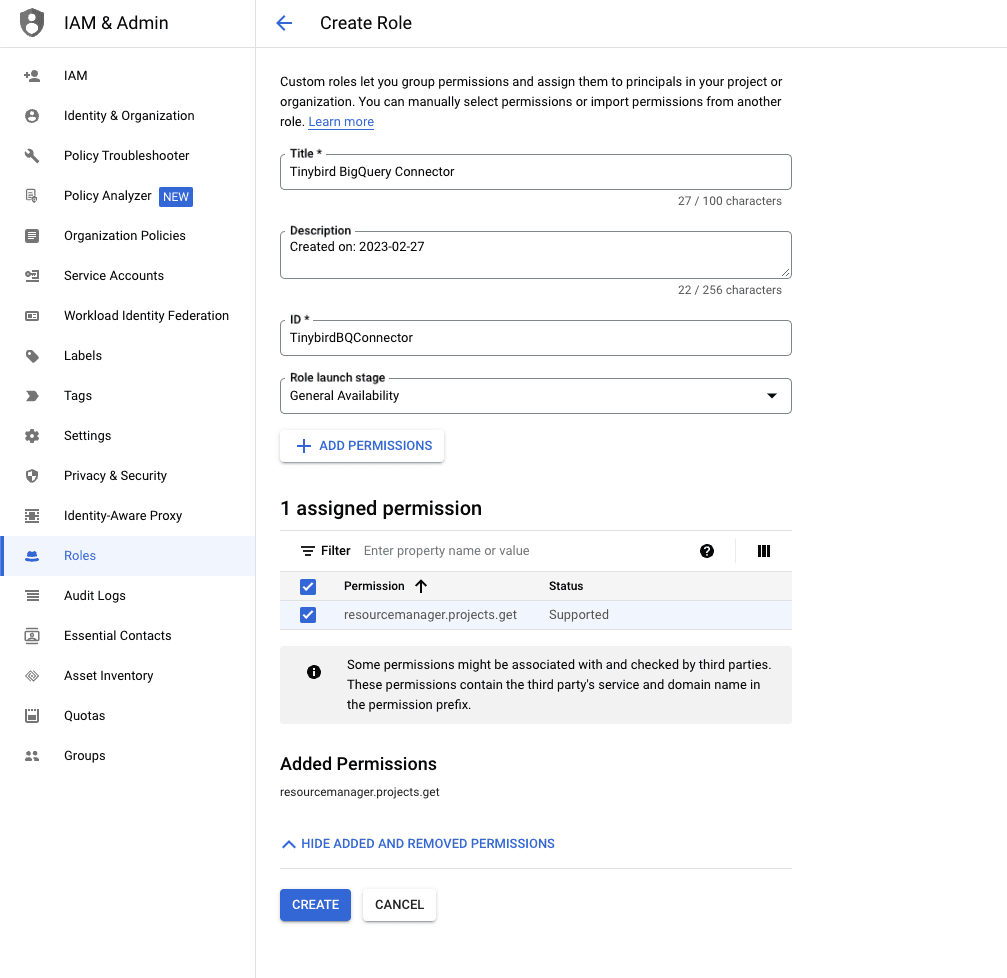
The Connector needs this permission to list the available projects the generated Service Account has access to, so you can explore the BigQuery tables and views in the Tinybird UI.
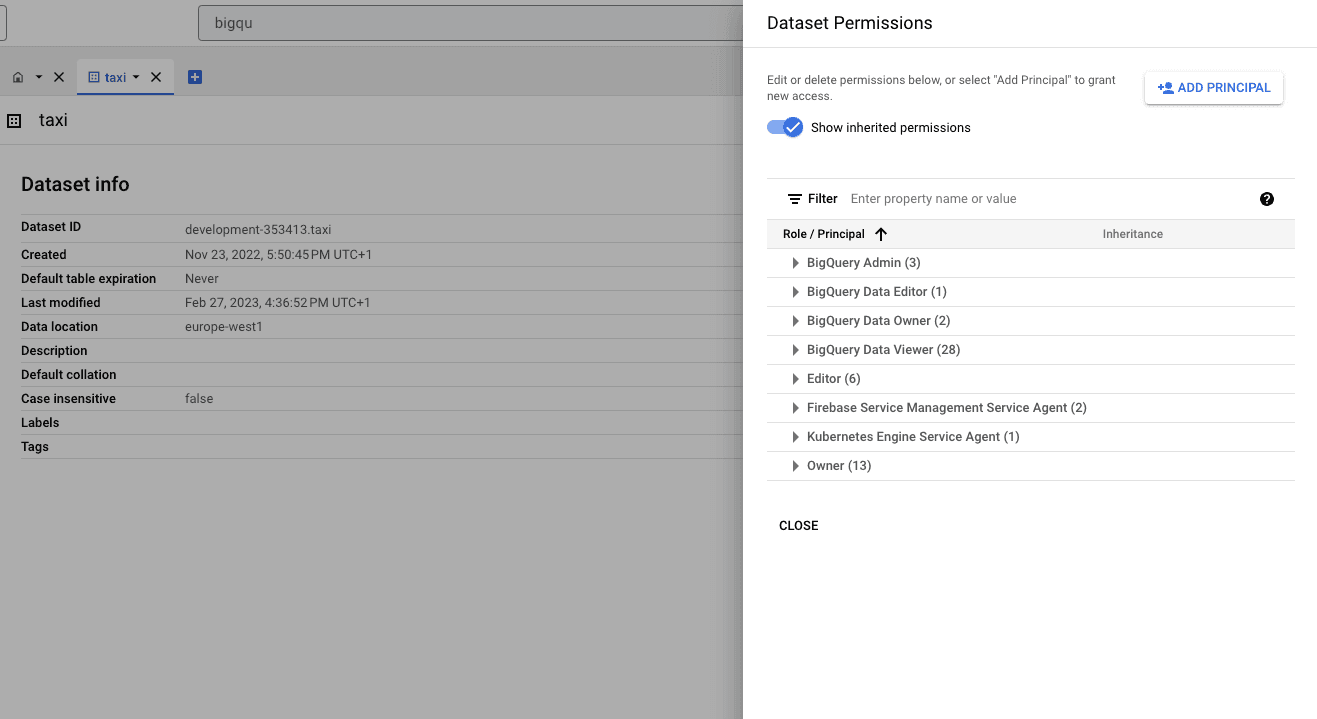
After that, you can grant permissions to specific datasets to the Service Account by clicking on Sharing > Permissions:
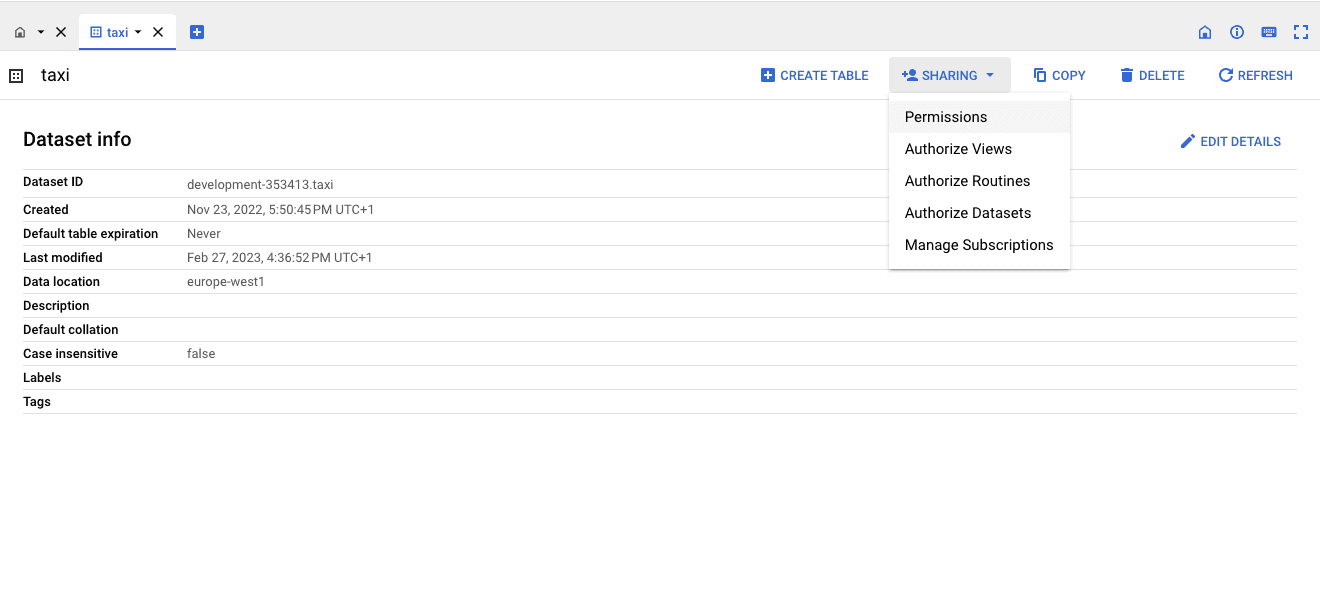
Then ADD PRINCIPAL:
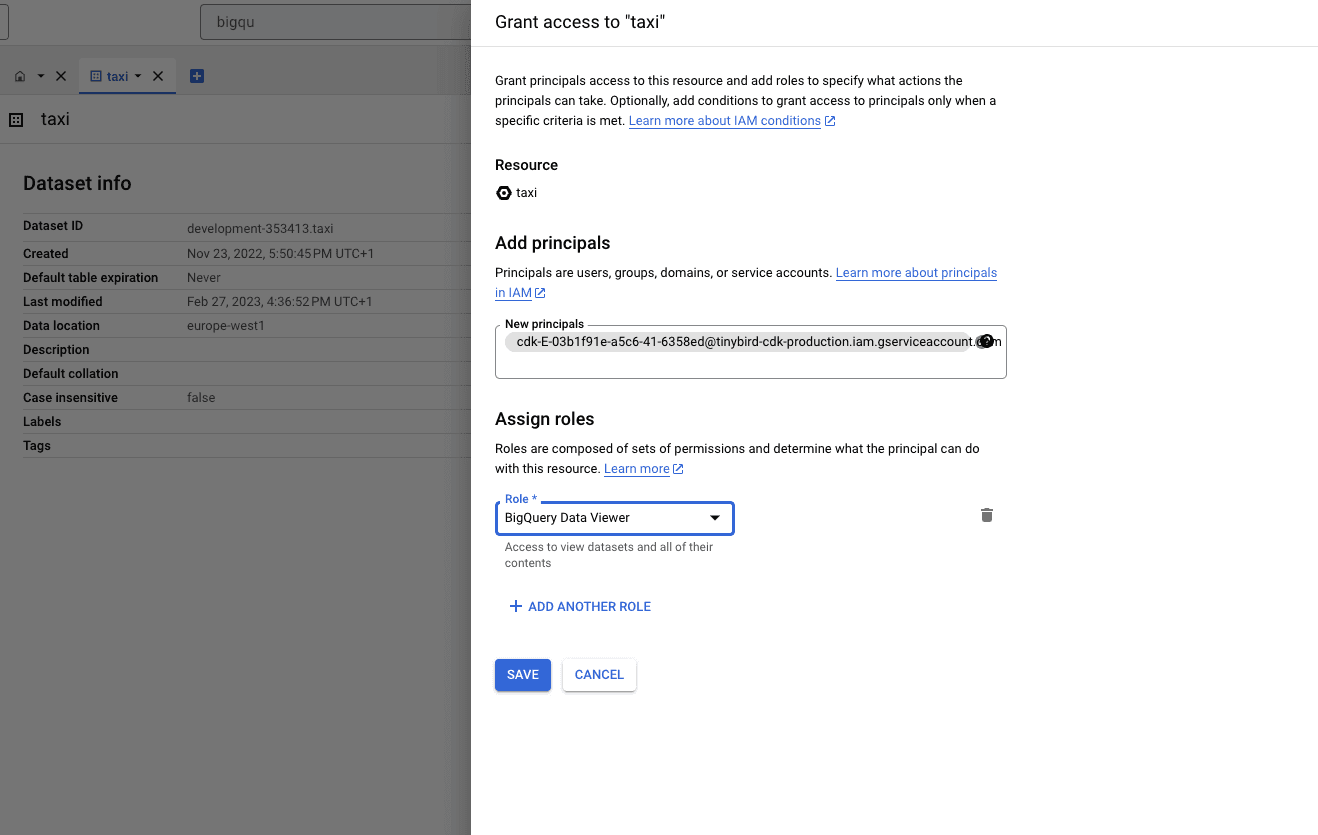
And finally paste the principal name copied earlier into the New principals box. Next, in the Role box, find and select the role BigQuery Data Viewer:
Now the Tinybird Connector UI only shows the specific resources you've granted permissions to.
Schema evolution
The BigQuery Connector supports backwards compatible changes made in the source table. This means that, if you add a new column in BigQuery, the next sync job will automatically add it to the Tinybird Data Source.
Non-backwards compatible changes, such as dropping or renaming columns, are not supported and will cause the next sync to fail.
Limits
The import jobs are run in a pool, with capacity for up to 2 concurrent jobs. If more scheduled jobs overlap, they'll be queued.
BigQuery Connector usage limits
| Description | Limit and time window |
|---|---|
| Maximum frequency for the scheduled jobs | 5 minutes |
| Maximum rows per append or replace | 50 million rows |