---
title: "A practical guide to real-time CDC with MongoDB"
excerpt: "A step-by-step guide to setting up Change Data Capture (CDC) with MongoDB Atlas, Confluent Cloud, and Tinybird."
authors: "Joe Karlsson"
categories: "I Built This!"
createdOn: "2023-09-25 00:00:00"
publishedOn: "2023-08-15 00:00:00"
updatedOn: "2025-12-10 00:00:00"
status: "published"
---

<p>Change Data Capture (CDC) is a design pattern that allows you to track and capture change streams from a source data system so that downstream systems can efficiently process these changes. In contrast to Extract, Transform, and Load (ETL) workflows, it can be used to update data in real-time or near real-time between databases, data warehouses, and other systems. The changes include inserts, updates, and deletes, and are captured and delivered to the target systems without requiring the source database to be queried directly.</p>
<!--kg-card-begin: html-->
<blockquote>In this post, you'll learn how to implement a real-time change data capture pipeline on change data in MongoDB.</blockquote>
<!--kg-card-end: html-->
<p>In this blog post, I'll describe how to implement a <a href="https://www.tinybird.co/blog-posts/real-time-change-data-capture">real-time change data capture (CDC)</a> pipeline on changes in MongoDB, using both Confluent and Tinybird.</p><h2 id="how-to-work-with-mongodb-change-streams-in-real-time">How to work with MongoDB change streams in real-time</h2><p>In this tutorial, I'll be using Confluent to capture change streams from MongoDB, and Tinybird to analyze MongoDB change streams using it's native Kafka Connector. Why Tinybird? For <a href="https://www.tinybird.co/blog-posts/real-time-analytics-a-definitive-guide">real-time analytics</a> on change data, <a href="https://www.tinybird.co/">Tinybird</a> serves as an ideal data sink. While MongoDB excels at operational workloads, <a href="https://www.tinybird.co/blog-posts/clickhouse-vs-mongodb">ClickHouse® significantly outperforms MongoDB for analytical queries</a>, making CDC pipelines an effective way to combine the strengths of both databases.</p><p>This is an alternative approach to using Debezium and Debezium’s MongoDB Connector, a popular open source framework for change data capture. It is a perfectly viable solution thanks to its MongoDB CDC connector, but this guide provides an alternative for <a href="https://www.tinybird.co/blog-posts/real-time-analytics-a-definitive-guide">real-time analytics</a> use cases.</p>
<!--kg-card-begin: html-->
<blockquote>Tinybird is the perfect data sink when you want to run real-time analytics over change data in MongoDB.</blockquote>
<!--kg-card-end: html-->
<p>With Tinybird, you can transform, aggregate, and filter MongoDB changes as they happen and expose them via high-concurrency, low-latency APIs. Using <a href="https://www.tinybird.co/">Tinybird</a> with your CDC data offers several benefits:</p><ol><li><strong>Real-Time Analytics</strong>: Tinybird processes MongoDB's oplog to provide real-time analytics on data changes.</li><li><strong>Data Transformation and Aggregation</strong>: With SQL Pipes, Tinybird enables real-time shaping and aggregation of the incoming MongoDB change data, a critical feature for handling complex data scenarios.</li><li><strong>High-Concurrency, Low-Latency APIs</strong>: Tinybird empowers you to publish your data transformations as APIs that can manage high concurrency with minimal latency, essential for real-time data interaction.</li><li><strong>Operational Intelligence</strong>: Real-time data processing allows you to gain operational intelligence, enabling proactive decision-making and immediate response to changing conditions in your applications or services.</li><li><strong>Event-Driven Architecture Support</strong>: Tinybird's processing of the oplog data facilitates the creation of <a href="https://www.tinybird.co/blog-posts/event-driven-architecture-best-practices-for-databases-and-files">event-driven architectures</a>, where MongoDB database changes can trigger business processes or workflows.</li><li><strong>Efficient Data Integration</strong>: Rather than batching updates at regular intervals, Tinybird processes and exposes changes as they occur, facilitating downstream system synchronization with the latest data.</li><li><strong>Scalability</strong>: Tinybird's ability to handle large data volumes and high query loads ensures that it can scale with your application, enabling the maintenance of real-time analytics even as data volume grows.</li></ol><h2 id="how-does-mongodb-cdc-work">How does MongoDB CDC work?</h2><p>CDC with MongoDB works primarily through the <a href="https://www.mongodb.com/docs/manual/core/replica-set-oplog/">oplog</a>, a special capped collection in MongoDB that logs all operations modifying the data stored in your databases.</p><p>When a change event such as an insert, update, or delete occurs in your MongoDB instance, the change is recorded in the oplog. This log is part of MongoDB's built-in replication mechanism and it maintains a rolling record of all data-manipulating operations.</p>
<!--kg-card-begin: html-->
<blockquote>Changes in MongoDB are recorded in its oplog, a built-in replication mechanism offered by MongoDB.</blockquote>
<!--kg-card-end: html-->
<p>CDC processes monitor this oplog, capturing the changes as they occur. These changes can then be propagated to other systems or databases, ensuring they have near real-time updates of the data.</p><p>
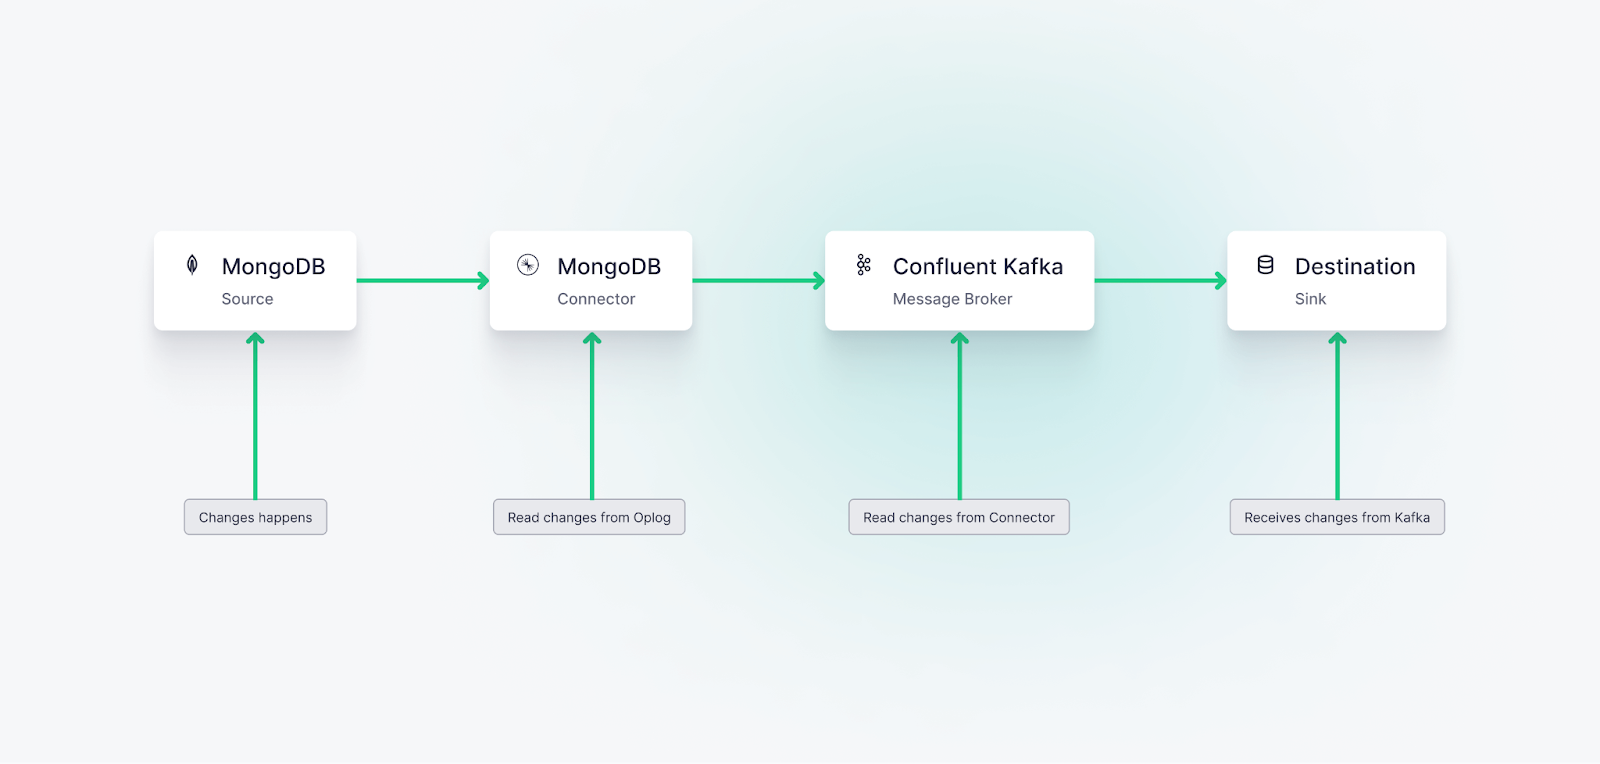
In the context of MongoDB Atlas and a service like Confluent Kafka, MongoDB Atlas runs as a replica set and is configured to generate an oplog. A connector (like the MongoDB Source Connector) is then used to pull the changes from MongoDB's oplog and stream these changes to Kafka topics. From there, these changes can be further processed or streamed to other downstream systems as per your application requirements.</p><figure class="kg-card kg-image-card kg-card-hascaption"><img src="https://tinybird-blog.ghost.io/content/images/2023/09/64dba5b674cb66222239040e_fs3Kya-Fr3-pVXQ6zfGHYiH9niY1AvQHjmR1SbYdE4aYLGpZa-343tpsLtMvijOCb7Kl4rQw2MY6pFnHT18EsihaJkwUDn-QITfrmiiPYDZ2skkvHoy1h5A2YGP4Y8OVTzT5FRIdE0bUUvYxjPtDTxM-9.png" class="kg-image" alt="A diagram showing change data capture from MongoDB to Confluent to Tinybird" loading="lazy" width="1600" height="764" srcset="https://tinybird-blog.ghost.io/content/images/size/w600/2023/09/64dba5b674cb66222239040e_fs3Kya-Fr3-pVXQ6zfGHYiH9niY1AvQHjmR1SbYdE4aYLGpZa-343tpsLtMvijOCb7Kl4rQw2MY6pFnHT18EsihaJkwUDn-QITfrmiiPYDZ2skkvHoy1h5A2YGP4Y8OVTzT5FRIdE0bUUvYxjPtDTxM-9.png 600w, https://tinybird-blog.ghost.io/content/images/size/w1000/2023/09/64dba5b674cb66222239040e_fs3Kya-Fr3-pVXQ6zfGHYiH9niY1AvQHjmR1SbYdE4aYLGpZa-343tpsLtMvijOCb7Kl4rQw2MY6pFnHT18EsihaJkwUDn-QITfrmiiPYDZ2skkvHoy1h5A2YGP4Y8OVTzT5FRIdE0bUUvYxjPtDTxM-9.png 1000w, https://tinybird-blog.ghost.io/content/images/2023/09/64dba5b674cb66222239040e_fs3Kya-Fr3-pVXQ6zfGHYiH9niY1AvQHjmR1SbYdE4aYLGpZa-343tpsLtMvijOCb7Kl4rQw2MY6pFnHT18EsihaJkwUDn-QITfrmiiPYDZ2skkvHoy1h5A2YGP4Y8OVTzT5FRIdE0bUUvYxjPtDTxM-9.png 1600w" sizes="(min-width: 720px) 720px"><figcaption><span style="white-space: pre-wrap;">Change data capture on MongoDB can be achieved using Confluent, thanks to its MongoDB source connector.</span></figcaption></figure><h2 id="how-to-set-up-cdc-with-mongodb-confluent-connect-and-tinybird">How to set up CDC with MongoDB, Confluent Connect, and Tinybird</h2><p>Let's create a CDC pipeline using MongoDB Atlas and Confluent Cloud.</p><h3 id="step-1-configure-mongodb-atlas">Step 1: Configure MongoDB Atlas</h3><ol><li><a href="https://www.mongodb.com/docs/guides/atlas/account/">Create an account with MongoDB Atlas</a>, and <a href="https://www.mongodb.com/docs/guides/atlas/cluster/">create your MongoDB database cluster</a> in MongoDB Atlas if you don't have one yet.</li><li>Ensure that your cluster runs as a replica set if you are running MongoDB locally. MongoDB Atlas clusters are replica sets by default, so if you create a cluster with Atlas, you shouldn’t have to do any extra configuration.</li><li>If you are running MongoDB locally, <a href="https://www.mongodb.com/docs/upcoming/core/replica-set-oplog/">check that MongoDB Atlas generates oplogs</a>. The oplog (operations log) is a special capped collection that keeps a rolling record of metadata describing all operations that modify the data stored in your databases. MongoDB Atlas does this by default, so again, no extra configuration should be required.</li></ol>
<!--kg-card-begin: html-->
<div class="tip-box"><div class="tip-box-container"><div class="tip-box-title">Note</div><div class="tip-box-content">Need some help configuring MongoDB? Check out the <a href="https://www.mongodb.com/docs/kafka-connector/master/sink-connector/fundamentals/change-data-capture/">MongoDB documentation</a> for change data capture.</div></div></div>
<!--kg-card-end: html-->
<h3 id="step-2-setup-confluent-cloud">Step 2: Setup Confluent Cloud</h3><ol><li><a href="https://www.confluent.io/confluent-cloud/">Sign up for a Confluent Cloud account</a> if you haven't done so already.</li><li><a href="https://docs.confluent.io/cloud/current/get-started/free-trial.html">Create a new environment and then create a new Kafka cluster within that environment</a>.</li><li>Take note of your Cluster ID, API Key, and API Secret. You'll need these later to configure your source and sink connectors.</li></ol>
<!--kg-card-begin: html-->
<div class="tip-box"><div class="tip-box-container"><div class="tip-box-title">Note</div><div class="tip-box-content">I’m using Confluent in this guide thanks to its easy MongoDB Source Connector, but you can theoretically use any other Kafka variant, including self-hosted Kafka (with Kafka Connect), Redpanda, Upstash, MSK, and more. Tinybird also supports <a href="https://www.tinybird.co/blog-posts/real-time-data-ingestion">real-time data ingestion</a> from other event streaming systems like Google Pub/Sub or Amazon Kinesis.</div></div></div>
<!--kg-card-end: html-->
<h3 id="step-3-configure-mongodb-connector-for-confluent-cloud">Step 3: Configure MongoDB Connector for Confluent Cloud</h3><ol><li>Install the <a href="https://docs.confluent.io/confluent-cli/current/install.html#cli-install">Confluent Cloud CLI</a>. Instructions for this can be found in the Confluent Cloud documentation.</li><li>Authenticate the Confluent Cloud CLI with your Confluent Cloud account:</li></ol>

```bash
confluent login --save
```

<ol><li>Use your Confluent Cloud environment and Kafka cluster:</li></ol>

```bash
confluent environment use $ENV_ID
confluent kafka cluster use $CLUSTER_ID
```

<p>For more details on this, check out the <a href="https://docs.confluent.io/confluent-cli/current/connect.html">Confluent Docs</a>.</p><ol><li>Describe the MongoDB source connector plugin:</li></ol>

```bash
confluent connect plugin describe MongoDbAtlasSource
```

<ol><li>Create the MongoDB source connector with the Confluent CLI. You'll need your <a href="https://www.mongodb.com/docs/guides/atlas/connection-string/">MongoDB Atlas connection string</a> for this. Create the connector:</li></ol>

```bash
confluent connect cluster create --config-file '{
  "connector.class":"MongoDbAtlasSource",
  "name":"mongo-source",
  "kafka.api.key":$API_KEY,
  "kafka.api.secret":$API_SECRET,
  "kafka.dedicated":$SR_ARN,
  "confluent.license":"",
  "confluent.topic.bootstrap.servers":$BOOTSTRAP_SERVER,
  "confluent.topic.replication.factor":"3",
  "mongodb.connection.uri":$CONNECTION_URI,
  "mongodb.database":$DB_NAME,
  "mongodb.collection":$COLLECTION,
  "output.data.format":"JSON",
  "output.topic.prefix":$TOPIC_PREFIX
}'
```

<p>Replace the placeholders with your actual values:</p><ul><li><code>$ENV_ID</code>: Your Confluent Cloud environment ID</li><li><code>$CLUSTER_ID</code>: Your Kafka cluster ID</li><li><code>$API_KEY</code>: Your Confluent Cloud API key</li><li><code>$API_SECRET</code>: Your Confluent Cloud API secret</li><li><code>$SR_ARN</code>: Your Schema Registry ARN (if using dedicated schema registry)</li><li><code>$BOOTSTRAP_SERVER</code>: The bootstrap server address from your Confluent Cloud cluster settings</li><li><code>$CONNECTION_URI</code>: Your MongoDB Atlas connection string</li><li><code>$DB_NAME</code>: Your MongoDB database name</li><li><code>$COLLECTION</code>: Your MongoDB collection name</li><li><code>$TOPIC_PREFIX</code>: Prefix for the Kafka topic name</li></ul>
<!--kg-card-begin: html-->
<div class="tip-box"><div class="tip-box-container"><div class="tip-box-title">Note</div><div class="tip-box-content">Remember to update your MongoDB Atlas security settings to allow connections from your Confluent Cloud and Tinybird servers. You can do this in the MongoDB Atlas dashboard under the Network Access section.</div></div></div>
<!--kg-card-end: html-->
<h3 id="step-4-install-and-set-up-tinybird">Step 4: Install and Set up Tinybird</h3><p>Before connecting Confluent to Tinybird, you need to install the Tinybird CLI and authenticate with your account. This guide uses the CLI for a hands-on technical workflow.</p><h4 id="install-tinybird-cli">Install Tinybird CLI</h4><p>First, install the Tinybird CLI on your machine:</p>

```bash
curl -L tinybird.co | sh
```

<p>This installs the Tinybird CLI tool and sets up Tinybird Local for local development. For more installation options, see the <a href="https://www.tinybird.co/docs/forward/install-tinybird">Tinybird installation guide</a>.</p><h4 id="authenticate-with-tinybird">Authenticate with Tinybird</h4><p>Next, authenticate with your Tinybird account:</p>

```bash
tb login
```

<p>This command opens a browser window where you can sign in to Tinybird Cloud. If you don't have an account yet, you can create one during this process. After signing in, create a new workspace or select an existing one.</p><p>For a complete quick start guide, see <a href="https://www.tinybird.co/docs/forward">Get started with Tinybird</a>.</p><h3 id="step-5-connect-confluent-cloud-to-tinybird">Step 5: Connect Confluent Cloud to Tinybird</h3><p>With CDC events being published to a Kafka stream in Confluent, your next step is connecting Confluent and Tinybird. This is quite simple using the <a href="https://www.tinybird.co/docs/forward/get-data-in/connectors/kafka">Tinybird Kafka Connector</a>, which will securely enable Tinybird to consume messages from your Confluent topic stream and write them into a <a href="https://www.tinybird.co/docs/concepts/data-sources.html">Data Source</a>.</p><p>The Kafka Connector is fully managed and requires no additional tooling. Simply connect Tinybird to your Confluent Cloud cluster, choose a topic, and Tinybird will automatically begin consuming messages from Confluent Cloud. As part of the ingestion process, Tinybird will extract JSON event objects with attributes that are parsed and stored in its underlying <a href="https://www.tinybird.co/blog-posts/real-time-databases-what-developers-need-to-know">real-time database</a>.</p><h4 id="create-a-kafka-connection">Create a Kafka connection</h4><p>First, create a connection to your Confluent Cloud Kafka cluster using the Tinybird CLI. You'll need the bootstrap server, API key, and secret that you saved from Step 2.</p><p>Run the following command to start the interactive wizard:</p>

```bash
tb connection create kafka
```

<p>The wizard will prompt you to enter:</p><ul><li>A name for your connection (e.g., <code>kafka_connection</code>)</li><li>The bootstrap server address from your Confluent Cloud cluster settings (e.g., <code>pkc-xxxxx.us-east-1.aws.confluent.cloud:9092</code>)</li><li>The API key you created in Step 2</li><li>The API secret you created in Step 2</li></ul><p>If your Confluent Cloud cluster uses a CA certificate, the wizard will also prompt you for the certificate path.</p><h4 id="create-a-kafka-data-source">Create a Kafka Data Source</h4><p>Now, create a Data Source that will consume messages from your Kafka topic. You can use the guided CLI process or create the files manually.</p><p><strong>Option 1: Use the guided CLI process (recommended)</strong></p><p>Run the following command to start the guided process:</p>

```bash
tb datasource create --kafka
```

<p>The CLI will prompt you to:</p><ol><li>Select or enter the connection name (use the name you created above, e.g., <code>kafka_connection</code>)</li><li>Enter the Kafka topic name (this is the topic name from Step 3, with the prefix you configured)</li><li>Enter a consumer group ID (use a unique name, e.g., <code>mongodb_cdc_consumer</code>)</li><li>Choose the offset reset behavior (<code>earliest</code> to read from the beginning, or <code>latest</code> to read only new messages)</li></ol><p><strong>Option 2: Manually create the Data Source files</strong></p><p>Alternatively, you can manually create a <code>.datasource</code> file. First, create the connection file if you haven't already. Create a file named <code>connections/kafka_connection.connection</code>:</p>

```tinybird
TYPE kafka
KAFKA_BOOTSTRAP_SERVERS BOOTSTRAP_SERVERS:PORT
KAFKA_SECURITY_PROTOCOL SASL_SSL
KAFKA_SASL_MECHANISM OAUTHBEARER
KAFKA_SASL_OAUTHBEARER_METHOD AWS
KAFKA_SASL_OAUTHBEARER_AWS_REGION AWS_REGION
KAFKA_SASL_OAUTHBEARER_AWS_ROLE_ARN {{ tb_secret("AWS_ROLE_ARN") }}
KAFKA_SASL_OAUTHBEARER_AWS_EXTERNAL_ID AWS_EXTERNAL_ID
```

<p>Then, create a Data Source file (e.g., <code>datasources/mongodb_cdc.datasource</code>) that references this connection. Here's an example that defines a Tinybird Data Source to hold the change events from your MongoDB collection. In your case, the <code>SCHEMA</code> should match the data in your Kafka topic, which includes the fields from your MongoDB documents. Use <a href="https://www.tinybird.co/docs/forward/dev-reference/datafiles/datasource-files#jsonpath-expressions">JSONPath expressions</a> to extract specific fields from the MongoDB CDC events into separate columns:</p>

```tinybird
SCHEMA >
    `_id` String `json:$._id`,
    `name` String `json:$.name`,
    `email` String `json:$.email`,
    `age` Int16 `json:$.age`,
    `city` String `json:$.city`,
    `created_at` DateTime `json:$.created_at`,
    `updated_at` DateTime `json:$.updated_at`

ENGINE "MergeTree"
ENGINE_PARTITION_KEY "toYYYYMM(__timestamp)"
ENGINE_SORTING_KEY "__timestamp"

KAFKA_CONNECTION_NAME kafka_connection
KAFKA_TOPIC mongodb_cdc.users
KAFKA_GROUP_ID {{ tb_secret("KAFKA_GROUP_ID") }}
```

<p>Replace <code>mongodb_cdc.users</code> with the actual topic name from Step 3 (with the prefix you configured). Adjust the schema fields to match the structure of your MongoDB documents. The <code>__timestamp</code> column is automatically added by Tinybird and represents when the event was ingested.</p><h4 id="deploy-the-data-source">Deploy the Data Source</h4><p>After creating your connection and Data Source files, deploy them to Tinybird Cloud:</p>

```bash
tb --cloud deploy
```

<p>You can also validate the setup before deploying by running:</p>

```bash
tb --cloud deploy --check
```

<p>This will verify that Tinybird can connect to your Kafka broker with the provided credentials.</p><p>Once deployed, Tinybird will automatically begin consuming messages from your Confluent topic, and you'll start seeing MongoDB change events stream into your Data Source as changes are made to the source data system.</p><h3 id="step-6-handle-deduplication-for-cdc-at-scale">Step 6: Handle Deduplication for CDC at Scale</h3><p>When implementing CDC at scale, deduplication is essential. MongoDB change streams can produce duplicate events due to network retries, connector restarts, or Kafka consumer rebalancing. Without proper deduplication, you'll have inconsistent analytics and incorrect aggregations.</p><p>There are several strategies for handling deduplication in Tinybird:</p><ul><li><strong>ReplacingMergeTree Engine</strong>: Use Tinybird's <code>ReplacingMergeTree</code> engine to automatically deduplicate rows based on a primary key. This is ideal when you have a unique identifier (like a document ID) and a timestamp or version field that indicates the latest state.</li><li><strong>Lambda Architecture</strong>: Implement a Lambda Architecture pattern where you maintain both a real-time stream and a batch layer. The batch layer provides the source of truth, while the stream layer provides low-latency updates. This approach is particularly effective for handling late-arriving data and ensuring eventual consistency.</li><li><strong>Query-time Deduplication</strong>: Use SQL functions like <code>argMax</code> to deduplicate at query time. This approach is flexible but can impact query performance on large datasets.</li></ul><p>For detailed guidance on implementing these strategies, see:</p><ul><li><a href="https://www.tinybird.co/docs/forward/work-with-data/optimize/guides/deduplication-strategies">Deduplication Strategies</a>: Comprehensive guide on deduplication techniques in Tinybird</li><li><a href="https://www.tinybird.co/docs/forward/work-with-data/optimize/guides/lambda-architecture">Lambda Architecture</a>: Guide on implementing Lambda Architecture patterns for real-time analytics</li></ul><h3 id="step-7-start-building-real-time-analytics-with-tinybird">Step 7: Start building real-time analytics with Tinybird</h3><p>Now your CDC data pipeline should be up and running, capturing changes from your MongoDB Atlas database, streaming them into Kafka on Confluent Cloud, and then sinking them into a <a href="https://www.tinybird.co/blog-posts/real-time-databases-what-developers-need-to-know">real-time, analytical datastore</a> on Tinybird’s <a href="https://www.tinybird.co/product">real-time data platform</a>.</p><p>You can now query, shape, join, and enrich your MongoDB CDC data with SQL <a href="https://www.tinybird.co/docs/concepts/pipes" rel="noreferrer">Pipes</a> and instantly publish your transformations as <a href="https://www.tinybird.co/docs/concepts/apis" rel="noreferrer">high-concurrency, low-latency APIs</a> to power your next use case.</p><p>For example, create a Pipe file (e.g., <code>pipes/get_mongodb_changes.pipe</code>) to query your MongoDB CDC data:</p>

```tinybird
NODE endpoint
SQL >
  SELECT
    _id,
    name,
    email,
    age,
    city,
    created_at,
    updated_at
  FROM mongodb_cdc
  ORDER BY __timestamp DESC
  LIMIT 100
```

<p>Deploy your Pipe to Tinybird Cloud:</p>

```bash
tb --cloud deploy
```

<p>After deployment, Tinybird automatically creates API endpoints for your Pipes. You can access your endpoint using the token you created. Here's an example of how to call the endpoint:</p>

```bash
curl "https://api.tinybird.co/v0/pipes/get_mongodb_changes.json?token=YOUR_TOKEN"
```

<p>The endpoint returns data in JSON format by default. You can also request other formats:</p><ul><li><code>.csv</code> for CSV format</li><li><code>.ndjson</code> for newline-delimited JSON</li><li><code>.parquet</code> for Parquet format</li></ul><p>Example response:</p>

```json
{
  "data": [
    {
      "_id": "507f1f77bcf86cd799439011",
      "name": "John Doe",
      "email": "john.doe@example.com",
      "age": 30,
      "city": "San Francisco",
      "created_at": "2023-08-15 10:30:00",
      "updated_at": "2023-08-15 10:30:00"
    }
  ],
  "rows": 1,
  "statistics": {
    "elapsed": 0.001,
    "rows_read": 1,
    "bytes_read": 256
  }
}
```

<h2 id="wrap-up">Wrap Up:</h2><p><a href="https://www.tinybird.co/blog-posts/real-time-change-data-capture">Change Data Capture</a> (CDC) is a powerful pattern that captures data changes and propagate them in real-time or near real-time between various systems. Using MongoDB as the source, changes are captured through its operations log (oplog) and propagated to systems like Confluent Kafka and Tinybird using a connector.</p><p>This setup enhances real-time data processing, reduces load on the source system, and maintains data consistency across platforms, making it vital for modern data-driven applications. The post walked through the steps of setting up a CDC pipeline using MongoDB Atlas, Confluent Cloud, and Tinybird, providing a scalable solution for handling data changes and powering <a href="https://www.tinybird.co/blog-posts/real-time-analytics-a-definitive-guide">real-time analytics</a>.</p><h2 id="resources">Resources:</h2><ol><li><a href="https://docs.atlas.mongodb.com/">MongoDB Atlas Documentation</a>: A comprehensive guide on how to use and configure MongoDB Atlas, including how to set up clusters.</li><li><a href="https://docs.confluent.io/cloud/current/index.html">Confluent Cloud Documentation</a>: Detailed information on using and setting up Confluent Cloud, including setting up Kafka clusters and connectors.</li><li><a href="https://www.confluent.io/hub/mongodb/kafka-connect-mongodb">MongoDB Connector for Apache Kafka</a>: The official page for the MongoDB Connector on the Confluent Hub. Provides in-depth documentation on its usage and configuration.</li><li><a href="https://www.tinybird.co/docs/forward/get-data-in/connectors/kafka">Kafka Connector Documentation</a>: Guide on setting up and using Tinybird's Kafka connector to ingest data from Kafka topics.</li><li><a href="https://www.tinybird.co/docs/forward/work-with-data/optimize/guides/deduplication-strategies">Deduplication Strategies</a>: Comprehensive guide on implementing deduplication strategies for real-time data pipelines.</li><li><a href="https://www.tinybird.co/docs/forward/work-with-data/optimize/guides/lambda-architecture">Lambda Architecture</a>: Guide on implementing Lambda Architecture patterns for handling real-time and batch data processing.</li><li><a href="https://docs.tinybird.co/">Tinybird Documentation</a>: A guide on using Tinybird, which provides tools for building real-time analytics APIs.</li><li><a href="https://en.wikipedia.org/wiki/Change_data_capture">Change Data Capture (CDC) Overview</a>: A high-level overview of CDC on Wikipedia, providing a good starting point for understanding the concept.</li><li><a href="https://kafka.apache.org/intro">Apache Kafka: A Distributed Streaming System</a>: Detailed information about Apache Kafka, a distributed streaming system that's integral to the CDC pipeline discussed in this post.</li></ol><h2 id="faqs">FAQs</h2><ol><li><strong>What is Change Data Capture (CDC)?</strong> CDC is a design pattern that captures changes in data so that downstream systems can process these changes in real-time or near real-time. Changes include inserts, updates, and deletes.</li><li><strong>Why is CDC useful?</strong> CDC provides several advantages such as enabling real-time data processing, reducing load on source systems, maintaining data consistency across platforms, aiding in data warehousing, supporting audit trails and compliance, and serving as a foundation for <a href="https://www.tinybird.co/blog-posts/event-driven-architecture-best-practices-for-databases-and-files">event-driven architectures</a>.</li><li><strong>How does CDC with MongoDB work?</strong> MongoDB uses an oplog (operations log) to record data manipulations like inserts, updates, and deletes. CDC processes monitor this oplog and capture the changes, which can then be propagated to other systems or databases.</li><li><strong>What is MongoDB Atlas?</strong> MongoDB Atlas is a fully managed cloud database service provided by MongoDB. It takes care of the complexities of deploying, managing, and healing your deployments on the cloud service provider of your choice.</li><li><strong>What is Confluent Cloud?</strong> Confluent Cloud is a fully managed, event streaming platform powered by Apache Kafka. It provides a serverless experience with elastic scalability and delivers industry-leading, real-time event streaming capabilities with Apache Kafka as-a-service.</li><li><strong>What is Tinybird?</strong> Tinybird is a <a href="https://www.tinybird.co/blog-posts/real-time-data-platforms">real-time data platform</a> that helps developers and data teams ingest, transform, and expose real-time datasets through APIs at any scale.</li><li><strong>Can I use CDC with other databases besides MongoDB?</strong> Yes, CDC can be used with various databases that support this mechanism such as <a href="https://www.tinybird.co/blog-posts/postgres-cdc">PostgreSQL</a>, <a href="https://www.tinybird.co/blog-posts/mysql-cdc">MySQL</a>, SQL Server, Oracle Database, and more. The specifics of implementation and configuration may differ based on the database system.</li><li><strong>How secure is data during the CDC process?</strong> The security of data during the CDC process depends on the tools and protocols in place. By using secure connections, authenticated sessions, and data encryption, data can be securely transmitted between systems. Both MongoDB Atlas and Confluent Cloud provide various security features to ensure the safety of your data.</li></ol>
