


Change Data Capture (CDC) is a powerful technique used in event-driven architectures to capture change streams from a source data system, often a database, and propagate them to other downstream consumers and data stores such as data lakes, data warehouses, or real-time data platforms. In the context of PostgreSQL, CDC provides a method to share the change events from Postgres tables without affecting the performance of the Postgres instance itself.
In this post, you'll learn how to build a real-time Postgres CDC pipeline using Confluent Cloud and Tinybird.
In this guide, I’ll show you how to build a real-time CDC pipeline using Postgres as a source database, Kafka Connect (via Confluent Cloud) as both the generator and the broadcaster of real-time CDC events, and Tinybird as the consumer of the CDC event streams. Tinybird also serves as a real-time data platform to run real-time analytics on your data change events. In addition, I’ll show you how to use Tinybird to provide an endpoint that returns current snapshots of the Postgres table as an eventually-consistent API.
There are many options for hosting PostgreSQL databases and streaming CDC events to Tinybird. To follow along, you will need access to a Postgres database that is generating changes that can become CDC events.
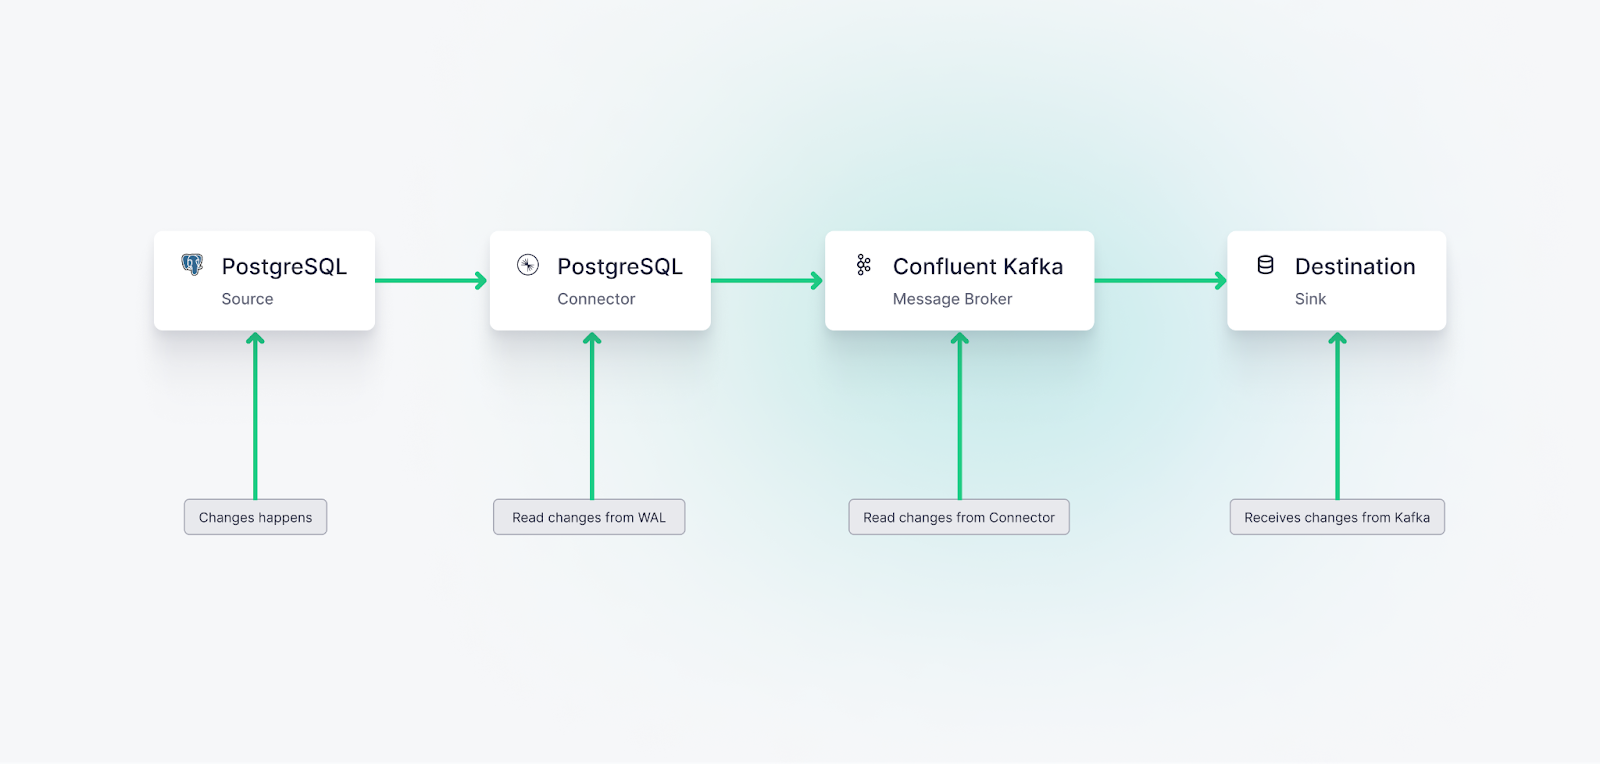
In this case, I am hosting my Postgres database instance on Amazon Web Services (AWS) Relational Database Service (RDS), reading CDC events with the Debezium-based Confluent Postgres CDC Connector, and publishing the CDC events on a Confluent-hosted Kafka stream. On the other end of that stream is a Tinybird Data Source, which collects those events and stores them in a columnar database optimized for real-time analytics.
Why Tinybird? Tinybird is an ideal sink for CDC event streams, as it can be used to both run analytics on the event streams themselves and create up-to-the-second views or snapshots of Postgres tables. In either case, Tinybird API endpoints serve downstream use cases powered by this real-time CDC pipeline.
To learn more about building API endpoints with custom query parameters using Tinybird, check out this blog post.
How does CDC work with Postgres?
PostgreSQL CDC is driven by its Write-Ahead Logging (WAL), which also supports its replication process. The WAL maintains a record of all database updates, including when changes are made to database tables. Anytime data is inserted, updated, or deleted, it is logged in the WAL.
Postgres CDC is driven by its Write-Ahead Logging. CDC tools read from this log, capturing changes as they occur, getting real-time change streams without placing strain on the Postgres server.
CDC processes monitor this WAL, capturing the changes as they occur. These changes can then be propagated to other systems or databases, ensuring they have near real-time updates of the data.
For this guide, we will be using the Confluent Postgres CDC Source Connector to read CDC events from the WAL in real time. The Connector will then write those events to a Kafka stream and auto-generate a Kafka Topic name based on the source database schema and table name. The Connector also handles the initial snapshot of the table along with streaming the change events, simplifying the overall process. This means you don’t have to worry about esoteric PostgreSQL details like replication slots, logical decoding, etc.
Setting up the CDC data pipeline from Postgres to Tinybird
There are six fundamental steps for setting up the CDC event stream:
- Confirm PostgreSQL server is configured for generating CDC events.
- Set up a Confluent Cloud stream cluster.
- Set up the Confluent Cloud Postgres CDC Connector.
- Install Tinybird and Connect to Confluent.
- Create a Tinybird Data Source to store Postgres CDC events.
- Handle Deduplication for CDC at Scale.
Step 1: Confirm PostgreSQL server is configured for generating CDC events
First, you need to confirm that your host database server is set up to generate CDC events and update configuration details if needed. You will need admin rights to make these changes or define a new user with CDC-related permissions.
This guide was developed with Confluent Cloud, and its Postgres CDC connector depends on the Postgres server rds.logical_replication = 1 setting.
See the Confluent Postgres CDC guide for more set-up and configuration details.
If you need to create a new Postgres database, you can use AWS RDS as I have done, or use other hosted PostgreSQL database providers such as Azure, DigitalOcean, Google Cloud, or Heroku (among many others).
Step 2: Set up a Confluent Cloud cluster
Sign up for a Confluent Cloud account if you haven't done so already.
Then, Create a new environment. By default, your initial environment will be named default, so I’ll use that as the environment name in this guide.
With your environment set up, create a new Kafka cluster within that environment. The cluster name should clearly describe its role since it is referenced in Tinybird data project files. You can create a stream cluster with the Confluent CLI or the Confluent Cloud UI.
Take note of the cluster’s bootstrap server, and create and store an API Key and Secret. You'll need these later to configure the Tinybird Confluent Connector (and any other script or tool using the Confluent APIs).
Step 3: Set up the Confluent Cloud Postgres CDC Connector
Debezium is an open-source platform for publishing CDC events on Kafka-based streams. For this guide, we are using Confluent and its managed Postgres CDC Source Connector, which is built on Debezium. Remember that this connector expects the Postgres server rds.logical_replication configuration setting to be set to 1.
Confluent Cloud Connectors can be set up using the Confluent Cloud user-interface (UI) or the Confluent command-line interface (CLI). This guide (and a similar one that we’ve created for MongoDB CDC) focuses on using the CLI. If you’re curious about using the Confluent Cloud Web UI for this configuration, you can borrow the steps in this guide for MySQL change data capture.
Creating a Postgres CDC Source Connector with the Confluent CLI
First, install the Confluent Cloud CLI. Authenticate the Confluent Cloud CLI with your Confluent Cloud account:
```bash confluent login --save ```Use your Confluent Cloud environment and Kafka cluster:
```bash confluent environment use $ENV_ID confluent kafka cluster use $CLUSTER_ID ```For more details on this, check out the Confluent Docs.
Next, Create the Postgres CDC Source Connector with the Confluent CLI.
Note that you’ll need to create a configuration file and set the --config-file option to the path of this file. Below is an example file. Note that you will need to replace these with your actual values.
Note that you'll need to create a configuration file and set the --config-file option to the path of this file. Create the Postgres CDC Source Connector with the Confluent CLI:
Replace the placeholders with your actual values:
$ENV_ID: Your Confluent Cloud environment ID$CLUSTER_ID: Your Kafka cluster ID$API_KEY: Your Confluent Cloud API key$API_SECRET: Your Confluent Cloud API secret$DATABASE_HOST: Your PostgreSQL database host$DATABASE_PASSWORD: Your PostgreSQL database password
Note that I’m using the default Postgres database username postgres, so you may need to replace this as well.
Once you finish the Confluent Connector configuration, you should start seeing messages in your topic (assuming your PostgreSQL instance is actively being changed). These are the Postgres CDC events, and the Connector also writes these events to the stream in the host cluster.
The Postgres CDC Source Connector publishes these events in a Kafka Topic with an auto-generated name. The naming pattern uses <DATABASE-NAME>.<SCHEMA-NAME>.<TABLE-NAME> by default.
Step 4: Install Tinybird and Connect to Confluent
Before connecting Confluent to Tinybird, you need to install the Tinybird CLI and authenticate with your account. This guide uses the CLI for a hands-on technical workflow.
Install Tinybird CLI
First, install the Tinybird CLI on your machine:
```bash curl -L tinybird.co | sh ```This installs the Tinybird CLI tool and sets up Tinybird Local for local development. For more installation options, see the Tinybird installation guide.
Authenticate with Tinybird
Next, authenticate with your Tinybird account:
```bash tb login ```This command opens a browser window where you can sign in to Tinybird Cloud. If you don't have an account yet, you can create one during this process. After signing in, create a new workspace or select an existing one.
For a complete quick start guide, see Get started with Tinybird.
Step 5: Connect Tinybird to Confluent Cloud and Create a Data Source
With CDC events being published to a Kafka stream in Confluent, your next step is connecting Confluent and Tinybird. This is quite simple using the Tinybird Kafka Connector, which will securely enable Tinybird to consume messages from your Confluent topic stream and write them into a Data Source.
The Kafka Connector is fully managed and requires no additional tooling. Simply connect Tinybird to your Confluent Cloud cluster, choose a topic, and Tinybird will automatically begin consuming messages from Confluent Cloud. As part of the ingestion process, Tinybird will extract JSON event objects with attributes that are parsed and stored in its underlying real-time database.
Create a Kafka connection
First, create a connection to your Confluent Cloud Kafka cluster using the Tinybird CLI. You'll need the bootstrap server, API key, and secret that you saved from Step 2.
Run the following command to start the interactive wizard:
```bash tb connection create kafka ```The wizard will prompt you to enter:
- A name for your connection (e.g.,
kafka_connection) - The bootstrap server address from your Confluent Cloud cluster settings (e.g.,
pkc-xxxxx.us-east-1.aws.confluent.cloud:9092) - The API key you created in Step 2
- The API secret you created in Step 2
If your Confluent Cloud cluster uses a CA certificate, the wizard will also prompt you for the certificate path.
Create a Kafka Data Source
Now, create a Data Source that will consume messages from your Kafka topic. You can use the guided CLI process or create the files manually.
Option 1: Use the guided CLI process (recommended)
Run the following command to start the guided process:
```bash tb datasource create --kafka ```The CLI will prompt you to:
- Select or enter the connection name (use the name you created above, e.g.,
confluent_connection) - Enter the Kafka topic name (this is the auto-generated topic name from Step 3, following the pattern
<DATABASE-NAME>.<SCHEMA-NAME>.<TABLE-NAME>) - Enter a consumer group ID (use a unique name, e.g.,
postgres_cdc_consumer) - Choose the offset reset behavior (
earliestto read from the beginning, orlatestto read only new messages)
Option 2: Manually create the Data Source files
Alternatively, you can manually create a .datasource file. First, create the connection file if you haven't already. Create a file named connections/kafka_connection.connection:
Then, create a Data Source file (e.g., datasources/users.datasource) that references this connection. Here's an example that defines a Tinybird Data Source to hold the change events from your Postgres table. In your case, the SCHEMA should match the data in your Kafka topic, which includes the columns from your Postgres table plus the change metadata introduced by Debezium/Kafka. Ensure that each column uses proper data types and that you properly configure your sorting key with the column you intend to use primarily for filtering. You can find more detailed instructions on creating Data Sources in the Kafka connector documentation.
Replace <DATABASE-NAME>.<SCHEMA-NAME>.<TABLE-NAME> with the actual topic name from Step 3 (e.g., postgres_cdc.public.users).
Deploy the Data Source
After creating your connection and Data Source files, deploy them to Tinybird Cloud:
```bash tb --cloud deploy ```You can also validate the setup before deploying by running:
```bash tb --cloud deploy --check ```This will verify that Tinybird can connect to your Kafka broker with the provided credentials.
Once deployed, Tinybird will automatically begin consuming messages from your Confluent topic, and you'll start seeing PostgreSQL change events stream into your Data Source as changes are made to the source data system.
Step 6: Handle Deduplication for CDC at Scale
When working with CDC at scale, deduplication is essential. CDC streams can produce duplicate events due to network retries, connector restarts, or Kafka consumer rebalancing. Without proper deduplication, you'll end up with multiple versions of the same record, leading to incorrect analytics and data inconsistencies.
For CDC pipelines at scale, you need to implement deduplication strategies. Tinybird provides several approaches:
- ReplacingMergeTree engine: Use this for simple deduplication based on a primary key and version column. This works well for most CDC use cases.
- Lambda architecture: For more complex scenarios where you need to aggregate over deduplicated data, use a lambda architecture pattern that combines real-time and batch processing.
- Query-time deduplication: For prototyping or small datasets, you can deduplicate at query time using SQL functions like
argMax.
For detailed guidance on implementing deduplication strategies for CDC, see the Deduplication Strategies guide. For handling aggregations over deduplicated CDC data, see the Lambda Architecture guide.
You can now query, shape, join, and enrich your PostgreSQL CDC data with SQL Pipes and instantly publish real-time analytics APIs to power your next use case. For more information on building analytics over change streams from Confluent, watch the screencast below.
In addition, you can create an API that returns a snapshot of the up-to-date Postgres table. For example, consider the Postgres table called users which mirrors the Tinybird Data Source schema we created above.
The first node in our SQL Pipe reads from the Data Source and produces a Materialized View that updates and deduplicates the users data as it arrives into a new, materialized Data Source. This is made possible using the ReplacingMergeTree ClickHouse® engine.
Create a Pipe file (e.g., pipes/users_mv.pipe) that creates the Materialized View:
From there, you can create a Tinybird API endpoint that requests and finalizes the results of the Materialized View for an up-to-date, consolidated snapshot of the original Postgres users table. Create a Pipe file (e.g., pipes/get_users_snapshot.pipe):
Deploy all your resources to Tinybird Cloud:
```bash tb --cloud deploy ```After deployment, Tinybird automatically creates API endpoints for your Pipes. You can access your endpoint using the token you created. Here's an example of how to call the endpoint:
```bash curl "https://api.tinybird.co/v0/pipes/get_users_snapshot.json?token=YOUR_TOKEN" ```The endpoint returns data in JSON format by default. You can also request other formats:
.csvfor CSV format.ndjsonfor newline-delimited JSON.parquetfor Parquet format
Example response:
```json { "data": [ { "id": 1, "name": "John Doe", "email": "john@example.com", "address": "123 Main St", "phone_number": "+1234567890", "email_verified": 1, "onboarded": 1, "deleted": 0, "lang": "en", "created_at": "2023-08-17 10:30:00", "updated_at": "2023-08-17 11:15:00" } ], "rows": 1, "statistics": { "elapsed": 0.001, "rows_read": 1, "bytes_read": 256 } } ```Wrap-up
This guide walked through the steps of setting up a real-time CDC pipeline using PostgreSQL, Confluent Cloud, and Tinybird, providing a scalable solution for handling data changes and powering real-time analytics over change data streams. You can use a similar workflow for other databases, including MongoDB.
If you're interested in using Tinybird for analyzing change data in real-time, you can sign up for free. There's no time limit on the free plan and no credit card required to get started. If you need support along the way, join our active Slack community for answers to your questions about change data capture and real-time analytics.
Resources:
- Change Data Capture (CDC) Overview: A good post for understanding how CDC flows work as a part of real-time, event-driven architectures.
- Confluent Cloud Documentation: Detailed information on using and setting up Confluent Cloud, including setting up Kafka clusters and connectors.
- Confluent Postgres CDC Source Connector: The official page for the Postgres CDC Source Connector on the Confluent Hub. Provides in-depth documentation on its usage and configuration.
- Debezium connector for PostgreSQL: Documentation for the open-source CDC connector for PostgreSQL.
- Tinybird Documentation: A guide on using Tinybird, a real-time data platform for data and engineering teams.
- Kafka Connector Documentation: Detailed guide on setting up and configuring the Kafka connector in Tinybird.
- Deduplication Strategies: Comprehensive guide on handling deduplication for CDC and other use cases at scale.
- Lambda Architecture: Guide on implementing lambda architecture patterns for aggregating over deduplicated CDC data.
- Change Data Capture (CDC) Overview: A high-level overview of CDC on Wikipedia, providing a good starting point for understanding the concept.
- Apache Kafka: A Distributed Streaming System: Detailed information about Apache Kafka, a distributed streaming system that's integral to the CDC pipeline discussed in this post.
FAQs
- How does CDC work with Postgres? PostgreSQL CDC is driven by its Write-Ahead Logging (WAL), which also supports its replication process. The WAL maintains a record of all database updates, including when changes are made to database tables. Anytime data is inserted, updated, or deleted, it is logged in the WAL. CDC processes monitor this WAL, capturing the changes as they occur.
- What is AWS RDS? RDS is a fully managed cloud database service provided by AWS. It takes care of the complexities of database administration.
- What is Confluent Cloud? Confluent Cloud is a fully managed, event streaming platform powered by Apache Kafka. It provides a serverless experience with elastic scalability and delivers industry-leading, real-time event streaming capabilities with Apache Kafka as-a-service.
- What is Tinybird? Tinybird is a real-time data platform for data and engineering teams to unify batch and streaming data sources, develop real-time data products with SQL, and empower their broader organizations to build revenue-generating use cases with with real-time data.
- Can I use CDC with other databases besides Postgres? Yes, CDC can be used with various databases that support this mechanism, such as MongoDB and MySQL. The specifics of implementation and configuration may differ based on the database system.