


Analytics is essential for every team, but getting the insights you need is rarely simple. Engineers often spend hours writing custom queries and building dashboards just to deliver the answers product, marketing, and growth teams need.
LLMs have made it possible to query data in natural language, which is a huge step forward. But even then, the output is usually walls of text - hard to read, interpret, and act on.
What if, instead of text or raw SQL results, you could get interactive, real-time visualizations like charts, tables, and dashboards that adapt dynamically to your queries?
Enter Generative UI for web analytics.
Generative UI is a user interface that is dynamically generated in real time by AI to provide an experience customized to fit the user’s intent and context. Instead of pre-built charts or static templates, the interface adapts in real time to the question at hand. Tinybird offers Explorations, a natural language chat interface with some generative UI capabilities for time series data. C1 expands on this by giving you immense flexibility in your generative UIs.
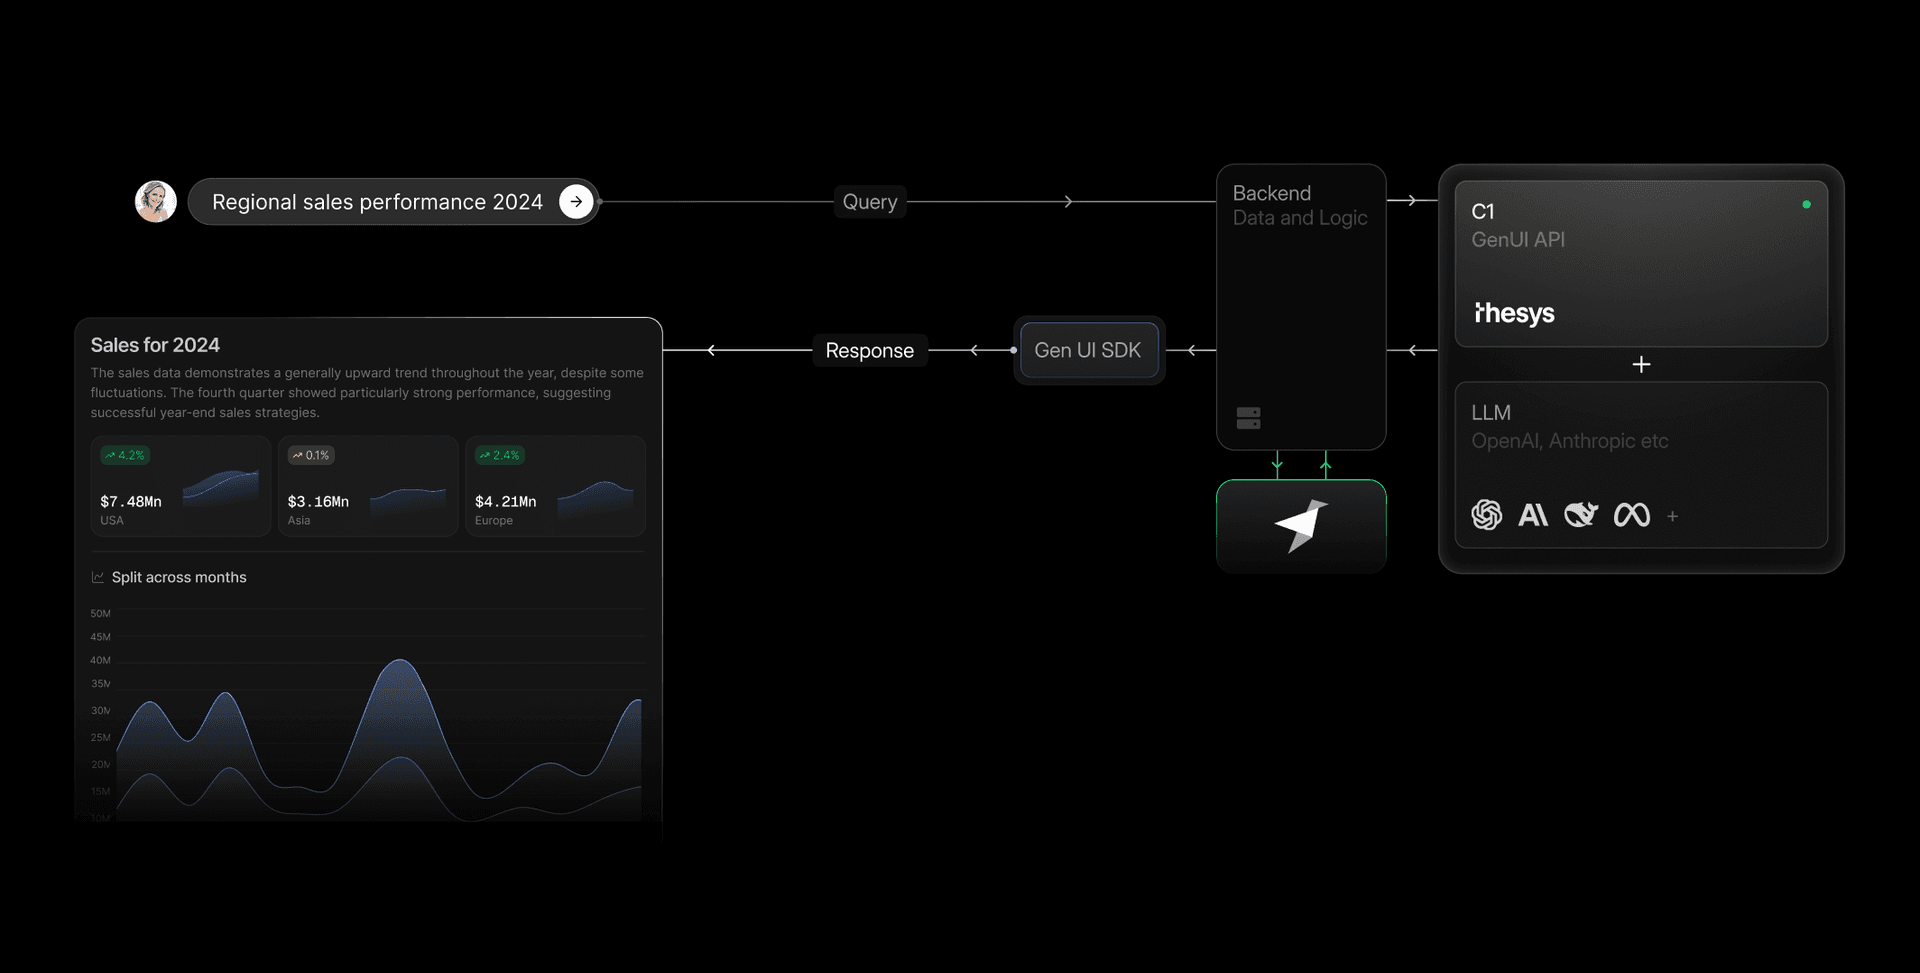
For example, asking "Show me weekly pageviews by source for the last month" doesn’t just return text or a pre-defined chart, it generates an interactive dashboard with tables, charts, and even follow-up queries tailored to your intent.
Tinybird + C1: Bringing generative UI to real-time analytics
Tinybird is a managed ClickHouse® service that lets developers build real-time analytics and data products over large datasets, with much of the infrastructure complexity handled for you.
The C1 API sits between your backend and an LLM, converting raw model outputs into a structured UI spec with state and actions. The C1 Gen UI SDK renders live as interactive React components with streaming and error handling - no manual UI code required.
Together, Tinybird and C1 let you turn raw analytics data into rich, interactive dashboards in minutes, freeing teams from the slow, rigid workflows of traditional dashboards.
Setup and implementation
Step 1: Next.js + C1 quickstart guide
Thesys provides a CLI to get a project running instantly. Open your terminal and run:
npx create-c1-app web-analytics-agent
This command scaffolds a complete Next.js application with the C1 SDK pre-installed and configured.
Step 2: Run the starter app
Navigate into the new directory and start the development server.
cd web-analytics-agent
npm run dev
Open http://localhost:3000. You'll see a working C1 application.
Step 3: Set up a Tinybird data project
Login to Tinybird and deploy the pre-built web analytics starter kit template.
tb login
tb --cloud deploy --template https://github.com/tinybirdco/web-analytics-starter-kit/tree/main/tinybird
The template includes a small fixture of sample data you can append for testing:
tb --cloud datasource append analytics_events fixtures/analytics_events.ndjson
Verify your setup with:
tb --cloud sql 'select uniq(session_id) from analytics_events'
You should see a row showing the unique session_id count in the sample data.
Step 4: Integrate the Tinybird MCP Server
First, make sure you have your Tinybird host URL and a READ token with access to the resources in your Tinybird project.
Store these in environment variables. Create a .env file in your project root:
TINYBIRD_HOST="<https://api.tinybird.co>"
TINYBIRD_TOKEN="YOUR_TINYBIRD_READ_TOKEN"
Check out the Tinybird MCP Server docs for more information on how to access the MCP server with a Tinybird token.
Step 5: Fetch data from Tinybird via MCP
Next, let's create a simple function to fetch data from Tinybird. Create a new file at app/api/chat/tools.ts:
import { Client } from "@modelcontextprotocol/sdk/client/index.js";
import { StreamableHTTPClientTransport } from "@modelcontextprotocol/sdk/client/streamableHttp.js";
import { RunnableToolFunctionWithParse } from "openai/lib/RunnableFunction";

let mcpClient: Client | null = null;
let mcpTools: RunnableToolFunctionWithParse<Record<string, unknown>>[] = [];

export function getTools() {
   return mcpTools;
}

export async function initializeMCP() {
   // Check to make sure the Tinybird token is available
   if (!process.env.TINYBIRD_TOKEN) {
       console.error('TINYBIRD_TOKEN environment variable not found');
       console.log('Get your token with `tb info ls` and `tb token copy`');
       process.exit(1);
   }

   try {
       // Tinybird remote MCP server URL with token for scoped permissions
       const url = new URL(`https://mcp.tinybird.co?token=${process.env.TINYBIRD_TOKEN}`);

       // Create the transport with a unique session ID
       const transport = new StreamableHTTPClientTransport(url);

       // Create and connect the MCP client
       mcpClient = new Client({
           name: "tinybird-mcp-client",
           version: "1.0.0",
       }, {
           capabilities: {}
       });

       await mcpClient.connect(transport);

       console.log('✅ Connected to Tinybird MCP server');

       // Fetch and list the available tools from the MCP Server
       const toolsList = await mcpClient.listTools();
       console.log('\nAvailable tools:');
       toolsList.tools.forEach(tool => {
           console.log(`  • ${tool.name}`);
       });

       // Convert MCP tools to OpenAI runnable format
       mcpTools = toolsList.tools.map(tool => ({
           type: "function" as const,
           function: {
               name: tool.name,
               description: tool.description || "",
               parse: (input: string) => {
                   return JSON.parse(input);
               },
               parameters: (() => {
                   const schema = tool.inputSchema || {
                       type: "object",
                       properties: {},
                   };

                   // Extract all property keys to add to required array
                   const properties = (schema as Record<string, unknown>).properties as Record<string, unknown> || {};
                   const allKeys = Object.keys(properties);

                   return {
                       ...schema,
                       additionalProperties: false,
                       // Include all property keys in required array (OpenAI strict mode requirement)
                       required: allKeys.length > 0 ? allKeys : undefined,
                   };
               })(),
               function: async (args: Record<string, unknown>) => {
                   console.log(`🔧 Executing MCP tool: ${tool.name}`, args);

                   // Call the MCP tool with the provided arguments
                   const result = await mcpClient!.callTool({
                       name: tool.name,
                       arguments: args,
                   });

                   // MCP tools return content array, extract the text
                   const contentArray = Array.isArray(result.content) ? result.content : [];
                   const content = contentArray
                       .map((item: { type?: string; text?: string }) => {
                           if (item.type === "text" && item.text) {
                               return item.text;
                           }
                           return JSON.stringify(item);
                       })
                       .join("\n");


                   console.log(`✅ Tool result: ${content.substring(0, 200)}...`);
                   return content;
               },
               strict: true,
           },
       }));

       console.log(`📦 Loaded ${mcpTools.length} tools`);
       return toolsList;

   } catch (error) {
       console.error('❌ Failed to connect to Tinybird MCP server:', error.message);
       process.exit(1);
   }
}

// Initialize MCP client when module loads
console.log('Initializing MCP client');
initializeMCP();
Next, modify the backend API route to use this function. Open src/app/api/route.ts and replace the mock data with a call to the new fetchTinybirdData function:
import { systemPrompt } from "./systemPrompt";
import { tools } from "./tools";

await initializeMCP();
const tools = getTools();


export async function POST(req: NextRequest) {
  ...
  const llmStream = await client.beta.chat.completions.runTools({
    model: "c1/anthropic/claude-sonnet-4/v-20250915",
    messages: [
      { role: "system", content: systemPrompt },
      ...messages
    ],
    initializeMcp(),
    stream: true,
  });
  ...
}
Let's see the agent in action
Restart your development server and open the app.
npm run dev
Ask, “Show me traffic for the past year.” Your agent fetches live Tinybird data, streams it to C1, and builds a real-time interactive chart. You can then use follow-up queries to keep exploring.

Conclusion
In just a few steps, you've built a web analytics agent powered by real-time analytics and generative UI. You've moved beyond the rigidity of traditional dashboards and the limitations of text-heavy AI responses.
By connecting a real-time analytics backend like Tinybird with a generative UI engine like C1, you've created a system that can understand questions and respond with dynamic, purpose-built interfaces. This pattern is incredibly powerful and can be extended to any data source, giving you the leverage to build sophisticated, AI-driven analytics faster than ever before.